

Want to play your iTunes songs on a USB drive, car stereo, or a non-Apple device? Many users find that tracks in their iTunes library aren't always compatible outside the Apple ecosystem, especially when they need a more universal format like MP3.
Whether you've purchased songs from iTunes or imported your own audio files, converting them to MP3 can make playback much more flexible across different devices and platforms. In this guide, you'll learn how to convert iTunes songs to MP3 step by step, export the files for use anywhere, and understand what to do if some tracks can't be converted.
- Can You Convert iTunes Songs to MP3?
- Method 1. Convert iTunes Songs to MP3 (Official Way)
- Method 2. Convert Protected iTunes Songs to MP3
- Method 3. Convert Apple Music Songs to MP3 (Best Alternative) 🔥
- Bonus Tip: Export MP3s from iTunes to Other Devices
- iTunes vs. Apple Music: Which Method Do You Need?
- FAQs About How to Convert iTunes Songs to MP3
- Conclusion
Can You Convert iTunes Songs to MP3?
Yes, but it depends on the type of songs in your iTunes library.
If your music comes from purchased downloads (especially those bought from the iTunes Store after 2009) or files you imported yourself, you can usually convert them to MP3 directly using iTunes or the Music app. These songs are stored as local audio files, which means they can be re-encoded into different formats like MP3.
However, not all songs in iTunes can be converted this way. For example, tracks from an active Apple Music subscription are not regular local files, and they won't support direct MP3 conversion through the built-in feature. In addition, some older iTunes purchases may use a protected format that also prevents standard conversion.
So before getting started, it's important to identify which type of songs you're dealing with. In the following sections, we'll walk you through 3 practical methods, covering standard iTunes conversions, solutions for protected files, and the best way to handle Apple Music tracks.
Method 1. Convert iTunes Songs to MP3 (Official Way)
If your songs are stored as local files in your iTunes library, such as purchased tracks or imported audio, you can convert them to MP3 directly using the built-in feature in iTunes (Windows) or the Music app on Mac. This method creates a new MP3 copy of your selected songs while keeping the original files unchanged. However, it does not apply to Apple Music tracks or certain protected files.
Step 1. Launch iTunes on your Windows computer, or open the Music app if you're using a Mac. Make sure your songs are already added to your library.
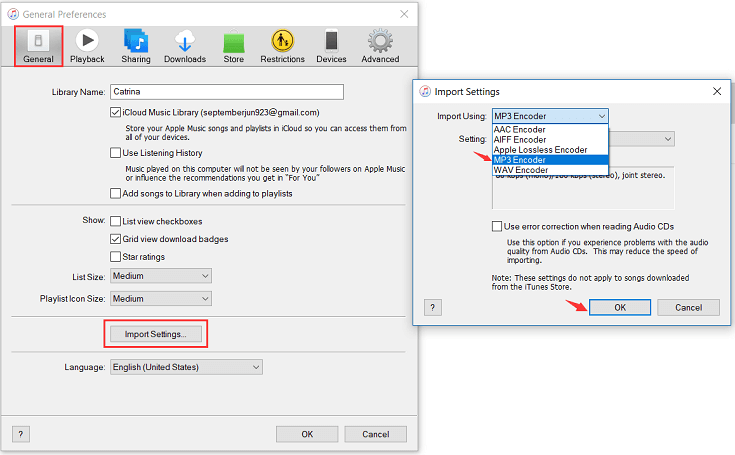
Step 2. Set MP3 Encoder in Import Settings.
- On Windows: Go to "Edit > Preferences > General > Import Settings".
- On Mac: Go to "Music > Settings > Files > Import Settings".
Then, choose "MP3 Encoder" from the "Import Using" dropdown and click "OK" to confirm.
Step 3. In your library, choose one or more songs you want to convert. Click "File > Convert > Create MP3 Version", and the app will generate a new MP3 version of each selected track.
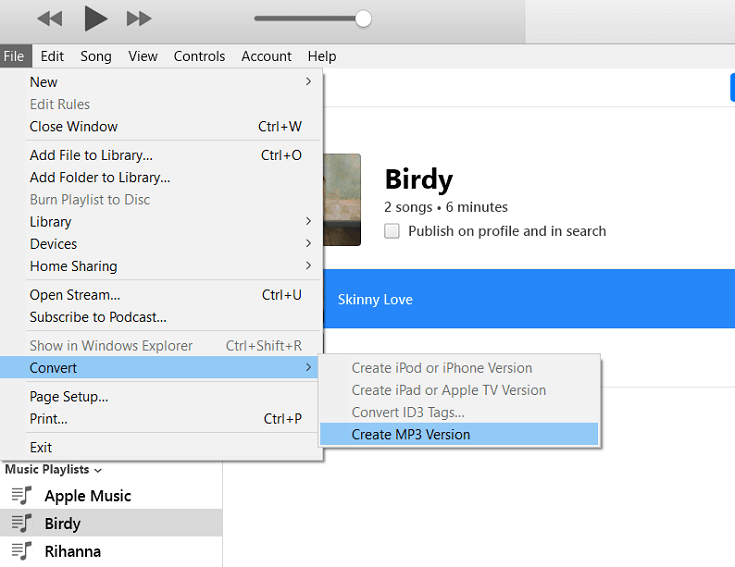
Step 4. Once the process is complete, the MP3 files will appear in your library alongside the original versions. You can right-click a song and choose "Show in Finder" or "Show in Windows Explorer" to locate the file.

Method 2. Convert Protected iTunes Songs to MP3
If your songs in your iTunes library can't be converted using the official method, they may be stored in a protected format, which typically applies to certain older iTunes purchases or audio files that don't support direct format conversion.
In this case, you'll need an alternative tool to process these files and convert them to standard formats like MP3. A practical solution is TuneFab iTunes Music Converter, which converts various audio formats in your iTunes library, including music, audiobooks, and podcasts, into widely supported formats such as MP3, M4A, WAV, or FLAC. With its help, you can freely play your music on different devices, transfer it to USB drives, or use it for editing and personal projects.
Note: This method is mainly useful for specific cases where iTunes' built-in conversion option is unavailable. For most modern iTunes purchases and imported files, the official method in Method 1 is still the simplest solution.
Step 1. Download and install the software on your computer, then open it. The program will automatically load your iTunes library.
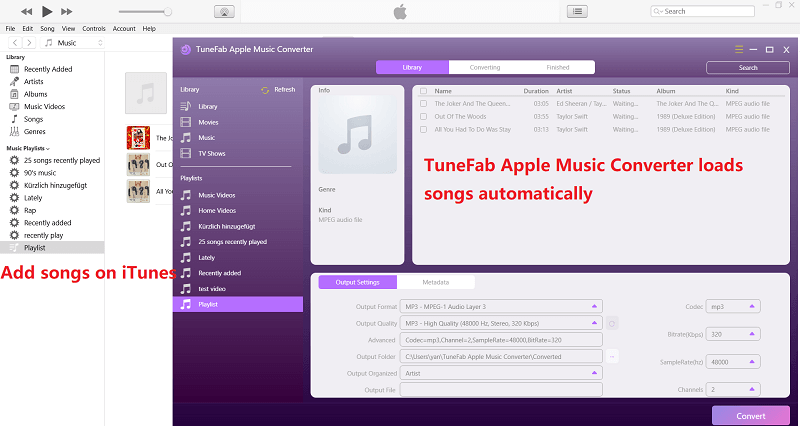
Step 2. Browse your library and choose the protected songs, audiobooks, or podcasts you want to convert.
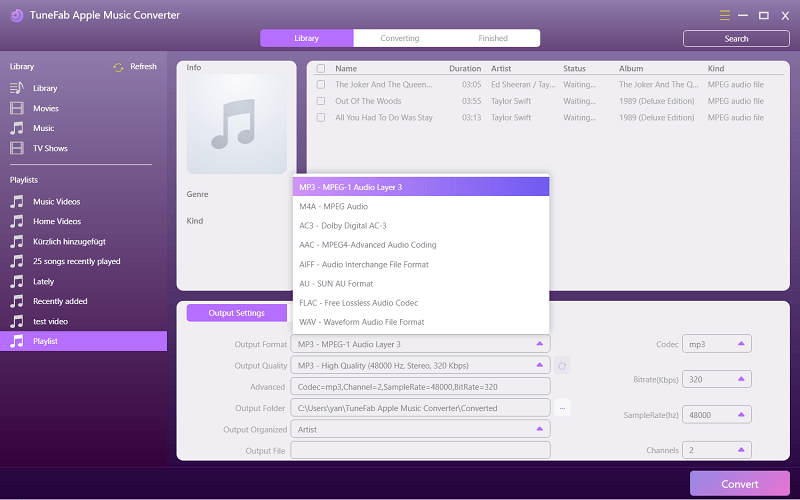
Step 3. Select MP3 or another desired format from the output settings. You can also adjust quality parameters if needed.
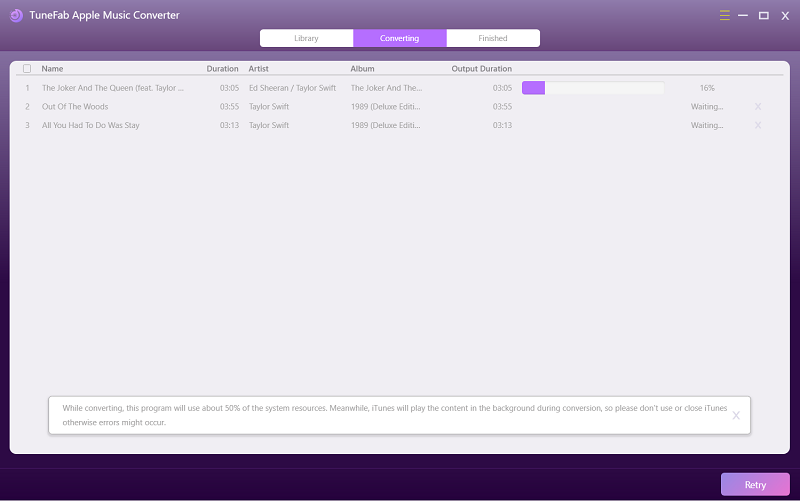
Step 4. Click the convert button to begin processing. Once completed, your files will be saved as standard audio formats for flexible playback.
Method 3. Convert Apple Music Songs to MP3 (Best Alternative)
If you're using Apple Music today, your listening experience is no longer limited to iTunes. On Mac, iTunes has been replaced by the Music app, and many users now manage both their purchased songs and streaming content in one unified library.
As long as you've enabled the "library sync" feature, your existing iTunes music collection can be combined with Apple Music tracks and accessed across devices. However, while this setup is convenient for playback, it doesn't change the fact that Apple Music songs are still streaming-based and don't support direct MP3 conversion using the built-in method.
In this case, a dedicated converter provides a more flexible solution. TuneFab Apple Music Converter is what you need. It has a built-in Apple Music web player, allowing you to access both your Apple Music and your synced iTunes library, helping you to easily convert Apple Music to MP3 and other unprotected formats, making it easier to play, transfer, or manage your music freely.
100% Secure
100% Secure
Key Features of TuneFab Apple Music Converter:
- Support both streaming Apple Music content and synced iTunes songs
- Convert Apple Music songs, albums, and playlists to MP3, M4A, WAV, or FLAC
- Support up to 320kbps output quality, with customizable bitrate and sample rate
- Preserve ID3 tags and metadata for better music organization
- Batch conversion for faster processing (up to 35X) of large libraries
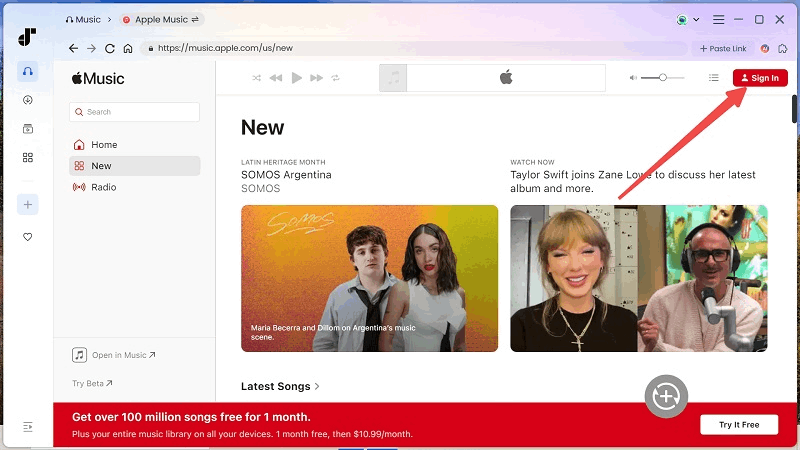
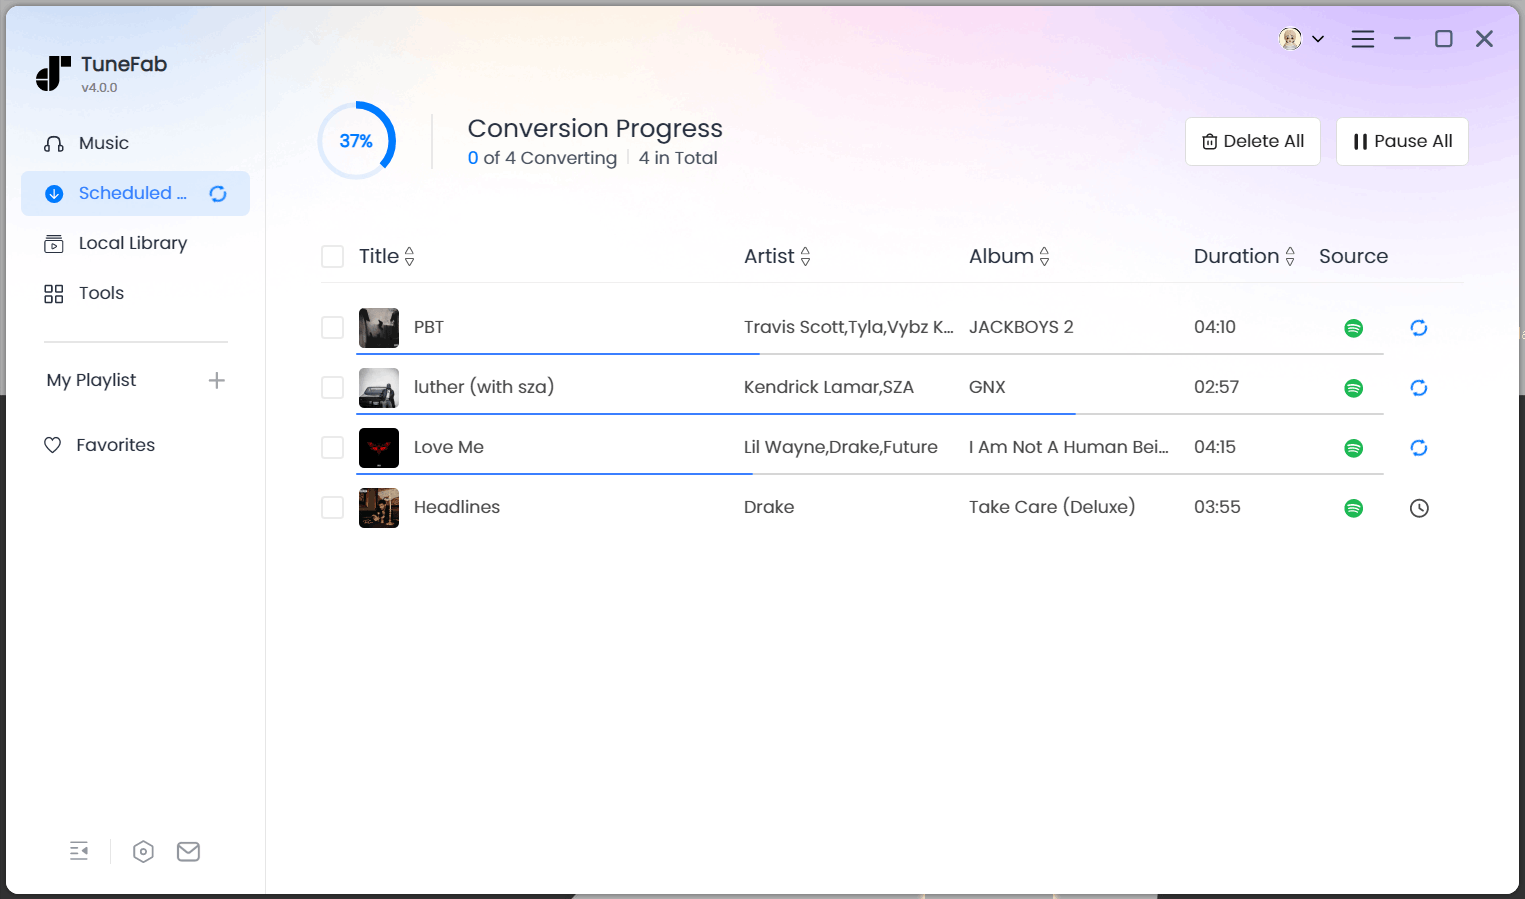
Step 1. Download and launch TuneFab Apple Music Converter, then sign in to your Apple Music account within the built-in player.
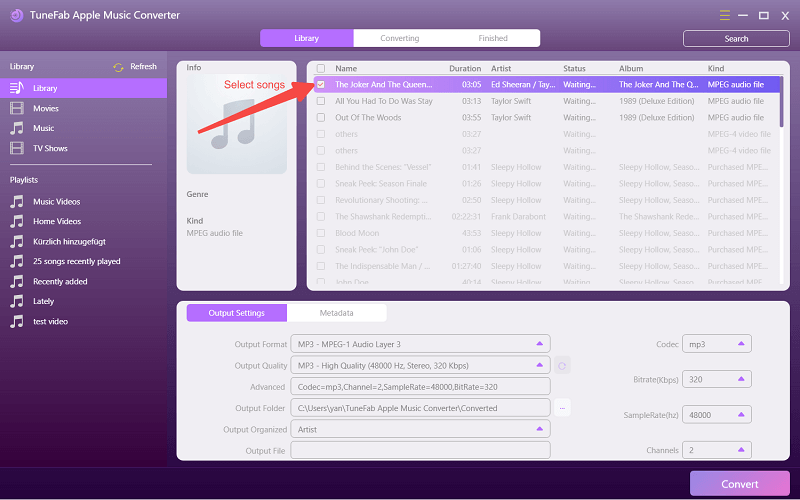
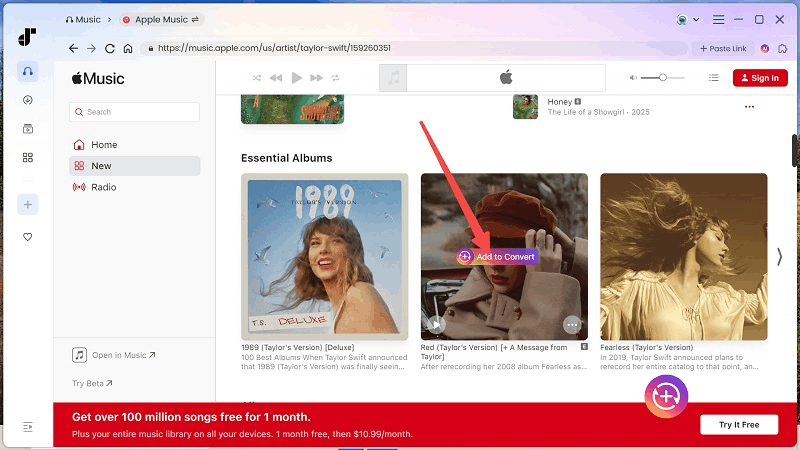
Step 2. Browse your library and choose the Apple Music content you want to convert by clicking the "Add to Convert" button.
Step 3. Select MP3 or another format, and adjust parameters such as bitrate or sample rate if needed.

Step 4. Click the "Convert Now" button to begin. Once finished, your music will be saved as local files. You can locate them under "Library" and export them for offline use on any device.
Bonus Tip: Export MP3s from iTunes to Other Devices
Once your songs have been converted to MP3, you can easily export them from your iTunes library and use them on other devices such as USB drives, car stereos, or MP3 players.
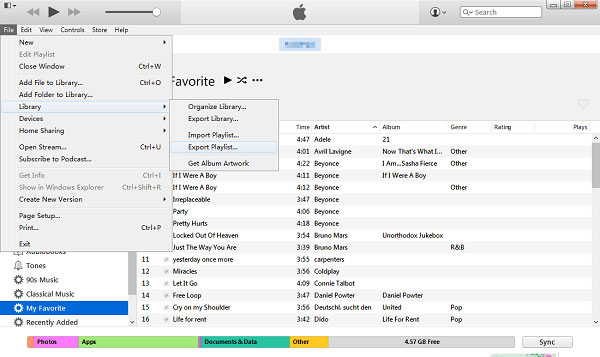
Step 1. In the iTunes app or the Music app, right-click your converted songs and select "Show in Windows Explorer" or "Export Library/Playlist" to open the file location.
Tips: If you use TuneFab Apple Music Converter, just locate the "library" tab, and click the "File" icon to find converted songs in the local folder you set.
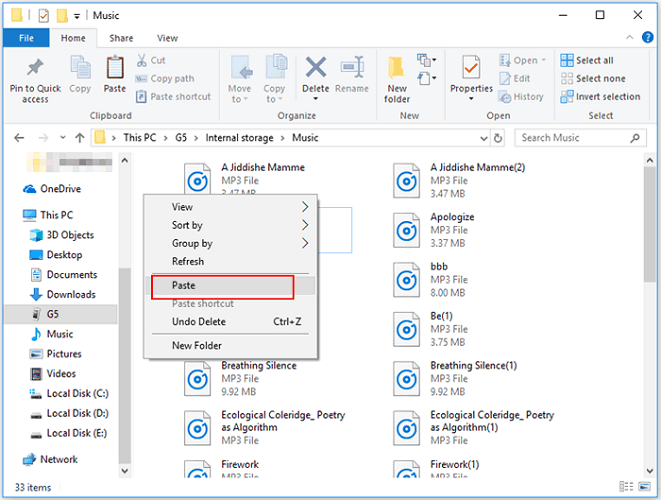
Step 2. Insert your USB drive or connect your external device, then drag and drop the MP3 files into the destination folder.
Step 3. Eject the device safely, then plug it into your car, speaker, or other compatible device to enjoy your music offline.
iTunes vs. Apple Music: Which Method Do You Need?
By now, you've seen that converting iTunes songs to MP3 isn't a one-size-fits-all process. The right method depends on where your music comes from, how it's stored, and what you want to do with it afterward. To make things clearer, here's a detailed comparison of the different approaches based on real usage scenarios:
| Methods | Supported Music Types | Apple Music Supported | Ease of Use | Supported Devices | Output Format | Output Quality |
| Convert with iTunes / Music App (Official Method) | Purchased iTunes songs (DRM-free), imported audio files, CDs | ❌ | Very easy (built-in feature) | Any device supporting MP3, AAC, WAV, AIFF | MP3, AAC, AIFF, WAV, Apple Lossless | Basic (preset bitrate options) |
| Convert Protected iTunes Files with iTunes Audio Converter | Older iTunes purchases, protected audio files | ⚠️ | Moderate (requires software) | Almost all devices compatible with MP3, M4A, FLAC, WAV | MP3, M4A, FLAC, WAV, etc. | Customizable |
| Convert Apple Music Songs with Apple Music Converter | Apple Music songs, playlists, albums, synced library | ✅ | Moderate (requires software) | All devices supporting MP3, M4A, FLAC, WAV | MP3, M4A, FLAC, WAV, etc. | Advanced (bitrate, sample rate adjustable) |
In short, if your music exists as local files, the official method is usually enough. But if your library includes Apple Music tracks or unsupported files, choosing the right alternative method will give you more flexibility for playback, transfer, and long-term use.
FAQs About How to Convert iTunes Songs to MP3
Can iTunes songs be converted to MP3?
Yes, iTunes songs can be converted to MP3 as long as they are stored as DRM-free local files, such as purchased tracks or imported audio. You can use the built-in conversion feature in iTunes or the Music app to create an MP3 version. However, Apple Music songs and certain protected files cannot be converted using this method.
Why can't I convert some songs to MP3 in iTunes?
If the "Create MP3 Version" option doesn't work, it usually means the song is not eligible for conversion. This often happens with Apple Music tracks or certain protected files that don't support direct format changes. In these cases, you'll need to use an alternative method instead of the built-in tool.
Can I convert Apple Music songs to MP3?
Apple Music songs cannot be converted to MP3 using iTunes or the Music app because they are streaming-based and not standard local files. To convert Apple Music tracks into MP3 for offline use on other devices, a dedicated converter is required.
Can I transfer iTunes songs to an MP3 player or USB drive?
Yes, after converting your iTunes songs to MP3, you can locate the files and copy them to a USB drive, MP3 player, or other compatible device. MP3 is widely supported, making it easy to play your music outside the Apple ecosystem.
Conclusion
Converting iTunes songs to MP3 is straightforward when your music is stored as DRM-free files, such as purchased tracks or imported audio. Using the built-in feature in iTunes or the Music app, you can easily convert iTunes songs to MP3 and export them for playback on USB drives, MP3 players, or other devices. This official method remains the simplest option for managing local music files.
However, if your library includes Apple Music songs or certain protected files, the standard conversion option may not work. In these cases, tools like TuneFab Apple Music Converter provide a practical way to convert Apple Music and synced libraries into MP3 or other common formats, giving you more flexibility to play and manage your music across different platforms.

TuneFab Apple Music Converter
One click to convert Apple Music and iTunes songs to MP3 with high quality.
