

Even in the streaming era, there are still moments when a physical CD makes sense. Maybe you want to create a personalized mixtape for a family member, prepare a disc for a car stereo that doesn't support Bluetooth, or keep a permanent backup of your favorite playlist. Burning music to a CD can still be practical and meaningful.
However, many users quickly discover that burning songs directly from Apple Music isn't always straightforward. Some playlists work, others don't, and the "Burn Playlist to Disc" option may even be grayed out. So what's really possible for burning Apple Music to CD right now? Let's learn what works and what doesn't.
Related Article:
- Best Apple Music Rippers: Recording & Converter Methods Included
- (2026) Best Apple Music Converters: Full Review & Comparison
- Quick Answer: Can You Burn Apple Music to a CD?
- Step 1. Check If Your Apple Music Songs Can Be Burned
- Step 2. What You Need to Burn Music to a CD
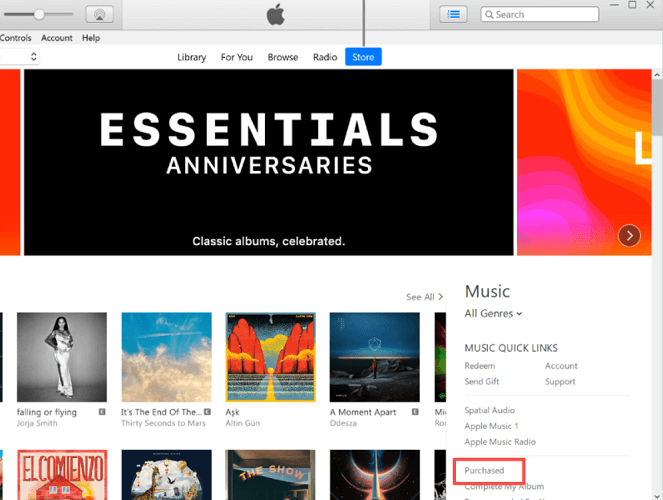
- Option A. Burn CDs from Owned/Purchased Apple Music
- Option B. Convert Streaming Apple Music and Burn It to CD 🔥
- Troubleshooting: Why Can't I Burn Apple Music to a CD?
- FAQs About Burning music from Apple Music to a CD
- Final Words
Quick Answer: Can You Burn Apple Music to a CD?
The short answer is: you cannot directly burn Apple Music subscription songs to a CD because they are protected by DRM (Digital Rights Management).
However, you can burn songs that you own, such as:
- Music purchased from the iTunes Store (after 2009, DRM-free);
- Songs ripped from CDs;
- Other local audio files stored on your computer.
Apple Music streaming tracks — even if downloaded for offline listening — are encrypted and cannot be burned using the built-in "Burn Playlist to Disc" feature.
So what are your options?
- ✅ If the songs are purchased or locally stored, you can burn them directly in the Music app (Mac) or iTunes (Windows).
- 🔄 If the songs come from an Apple Music subscription, you'll need to convert them into standard audio files first before creating a CD.
Below, we'll walk you through how to check your file type and choose the right method.
Step 1. Check If Your Apple Music Songs Can Be Burned
Before trying to burn a CD, the most important step is to check whether your songs are actually eligible for burning. Many users assume that if a song is downloaded, it can be burned, but that is not always true. The key difference is whether you own the file or are simply streaming it through an Apple Music subscription. Even downloaded Apple Music tracks remain DRM-protected and cannot be burned directly.
Here is how to check.
How to Show the "Kind" Column in Music/iTunes
To determine whether a song can be burned, you need to view its file type in the "Kind" column.
On Mac (Music app)
1. Go to your playlist.
2. Click View > as Songs.
3. Right-click the column header area.
4. Enable the "Kind" column.
On Windows (iTunes)
1. Go to your playlist.
2. Click View > View As > Songs.
3. Right-click the column header row.
4. Select "Kind".
The "Kind" column will show the file type for each track.
Which File Types Can Be Burned (Purchased vs Apple Music)
Here is what the "Kind" column means in practice:
| Apple Music Content Type | DRM-Protected | Can Burn to CD Directly |
| Apple Music streaming songs | Yes (FairPlay DRM) | ❌ No |
| Downloaded Apple Music songs | Yes | ❌ No |
| iTunes Store songs (after 2009) | No | ✅ Yes |
| Old iTunes purchases (before 2009) | Yes | ❌ No |
If you see "Apple Music AAC audio file", the track comes from a subscription and cannot be burned directly, even if it has been downloaded for offline listening. If your songs fall into the burnable categories, you can proceed with the official method. If not, you will need to convert them into standard audio files first before creating a CD.
Step 2. What You Need to Burn Music to a CD
Once you have confirmed that your songs are eligible or converted them into standard formats, you will need the right hardware and disc type to complete the process.
CD-R and Disc Types (Audio CD vs MP3 CD)
First, prepare a blank disc. Most users should choose a CD-R, which is write-once and widely compatible with standard CD players. There are two main types of CDs you can create:
Audio CD
- Plays on any traditional CD player (home stereo, car player)
- Holds about 74 to 80 minutes of music
- Converts files automatically during burning
MP3 CD
- Holds more songs since files remain compressed
- Requires an MP3-compatible CD player
- CBetter for long playlists
If you are burning a CD for use in an older car stereo or home system, choose Audio CD for maximum compatibility.
CD Drive (Built-in or External)
Modern laptops often do not include built-in CD drives. If your computer does not have one, you will need an external USB CD or DVD drive.
Option A. Burn CDs from Owned/Purchased Apple Music
If your songs are purchased from the iTunes Store or stored as local files on your computer, you can burn them directly using the built-in Music app on Mac or iTunes on Windows.
Note: This method does not work for Apple Music subscription tracks labeled as "Apple Music AAC audio file".
How to Burn a CD on Mac (Music App)
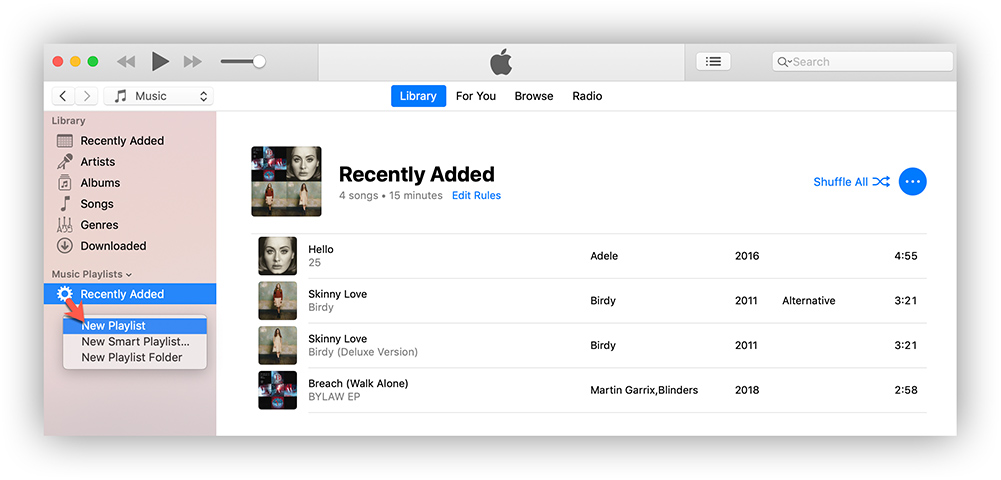
Step 1. Open the Music app and create a new playlist via "File > New > Playlist". Add all the songs you want to burn to this playlist.
Step 2. Insert a blank CD-R into your built-in drive or external USB CD drive.
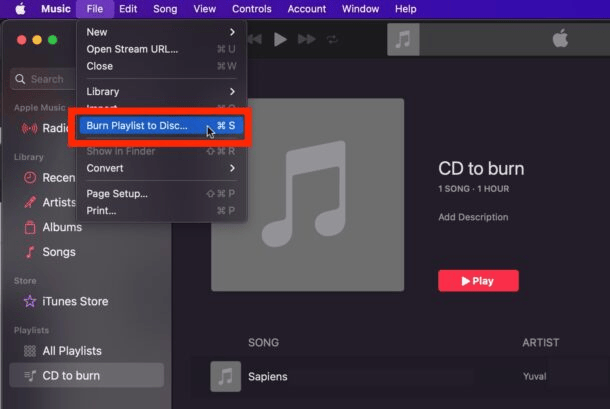
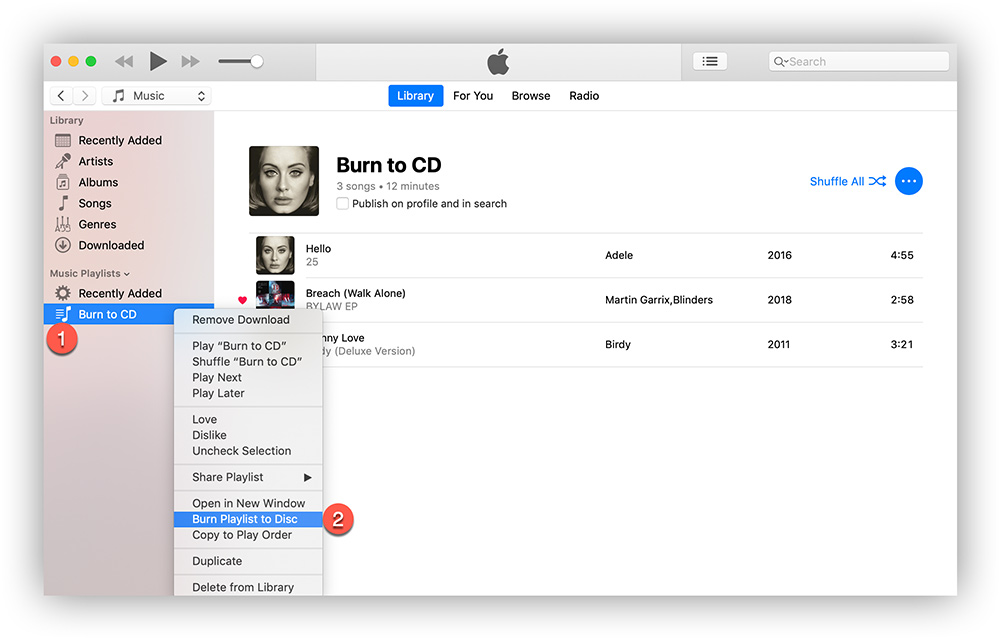
Step 3. Select the playlist in the sidebar, then click "File > Burn Playlist to Disc".
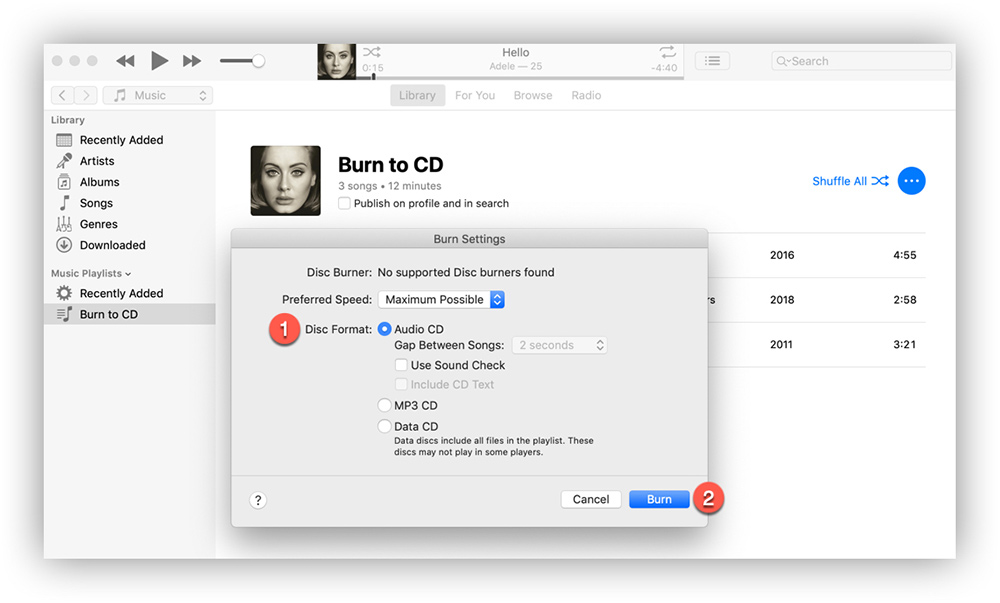
Step 4. Select "Audio CD" for maximum compatibility with car and home players, or choose "MP3 CD" if your device supports MP3 playback. Click "Burn" to begin.
The Music app will begin writing the tracks to the disc. The process may take several minutes, depending on the number of songs and recording speed.
How to Burn a CD on Windows (iTunes)
Step 1. Open iTunes and create a new playlist via "File > New > Playlist". Add the songs you want to burn.
Step 2. Insert a blank CD-R into your computer's disc drive.
Step 3. Select the playlist, then click "File > Burn Playlist to Disc".
Step 4. Choose "Audio CD" for standard CD players or "MP3 CD" for compatible devices. Then, click "Burn" to start the process.
iTunes will automatically convert files if necessary and begin writing the disc. If the burn option is unavailable, some tracks may be Apple Music subscription files.
Note:
- A standard audio CD holds about 74 to 80 minutes of music.
- If your playlist exceeds the limit, you will be prompted to insert another disc.
- If some songs cannot be burned, they may be subscription-based Apple Music tracks.
Option B. Convert Streaming Apple Music and Burn It to CD
If your playlist contains Apple Music subscription tracks, they cannot be burned directly because they are encrypted for streaming use. Even downloaded tracks inside the Apple Music app remain restricted and cannot be written to a physical disc. To create a CD of these songs, you first need to convert them into standard audio files that CD-burning software can recognize.
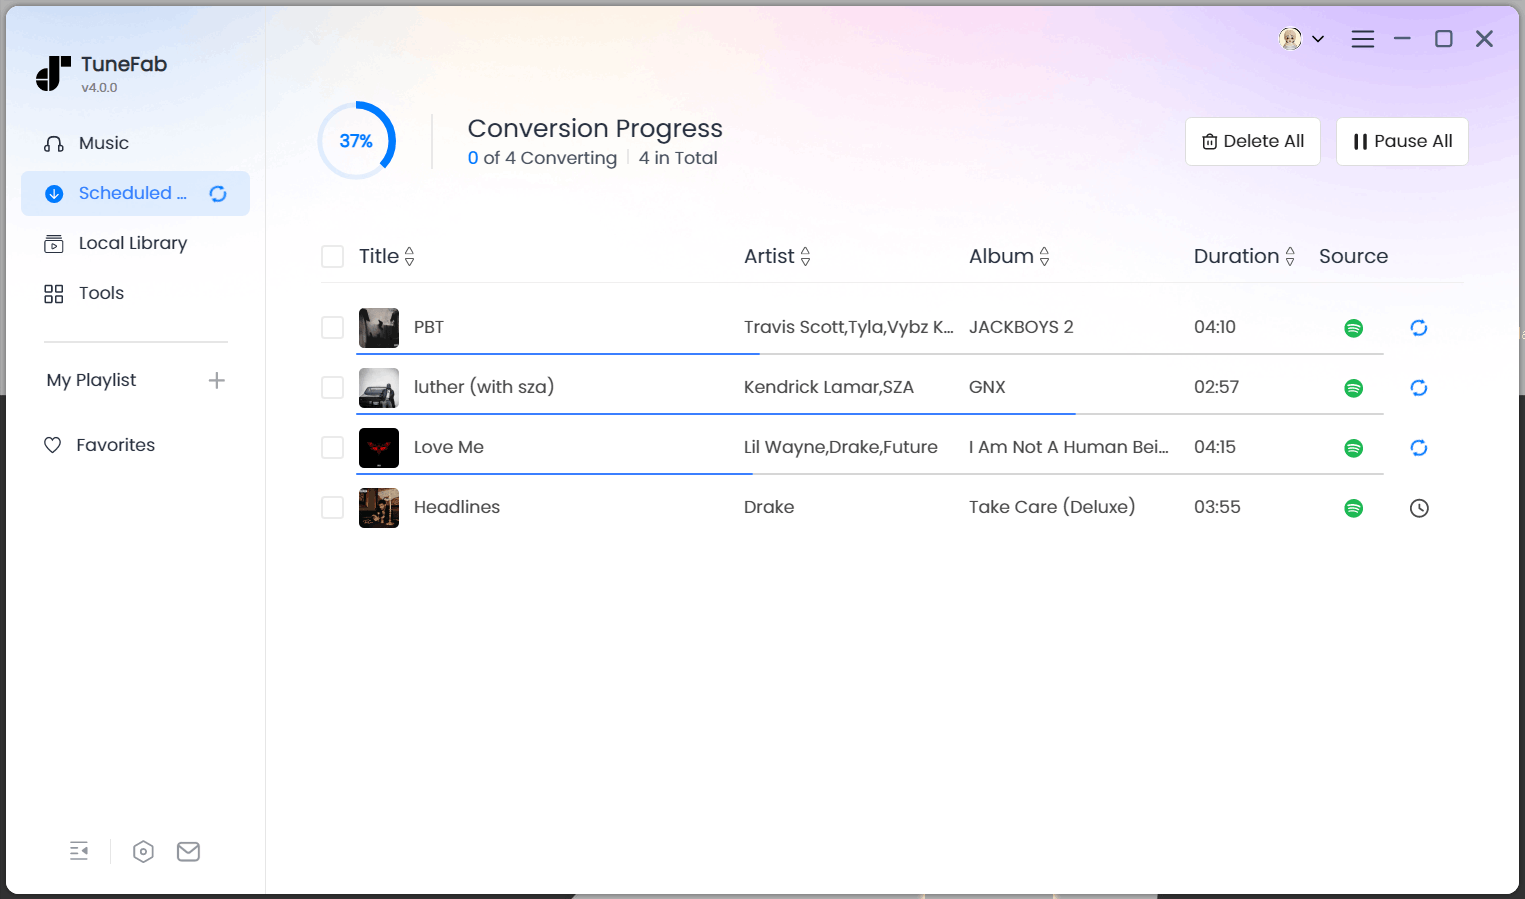
TuneFab Apple Music Converter is a professional application designed to convert Apple Music tracks to MP3, M4A, WAV, and FLAC common formats, which CDs can read. Once converted, the files are saved locally on your computer and behave like regular music files. This means you can burn them to an Audio CD, create an MP3 CD, transfer them to a USB drive, or keep a permanent copy for backup without relying on the Apple Music app.
100% Secure
100% Secure
👍 Features of TuneFab that Make the Process Reliable:
- Batch conversion lets you convert entire playlists at once, saving time before burning.
- Supports high-quality output, including 320 kbps MP3 and lossless WAV or FLAC, which are ideal for CD creation.
- Fast conversion speed (up to 35X) helps you prepare large playlists quickly.
- Preserves original ID3 tags and metadata so your burned CD displays correct song titles and artist information.
- Custom output settings allow you to organize files neatly before transferring or burning them.
👉 To learn more details about downloading Apple Music songs via TuneFab:
Convert Apple Music with TuneFab
Now, you can begin the process of converting Apple Music to FLAC/WAV in order to burn the converted songs to CD successfully.
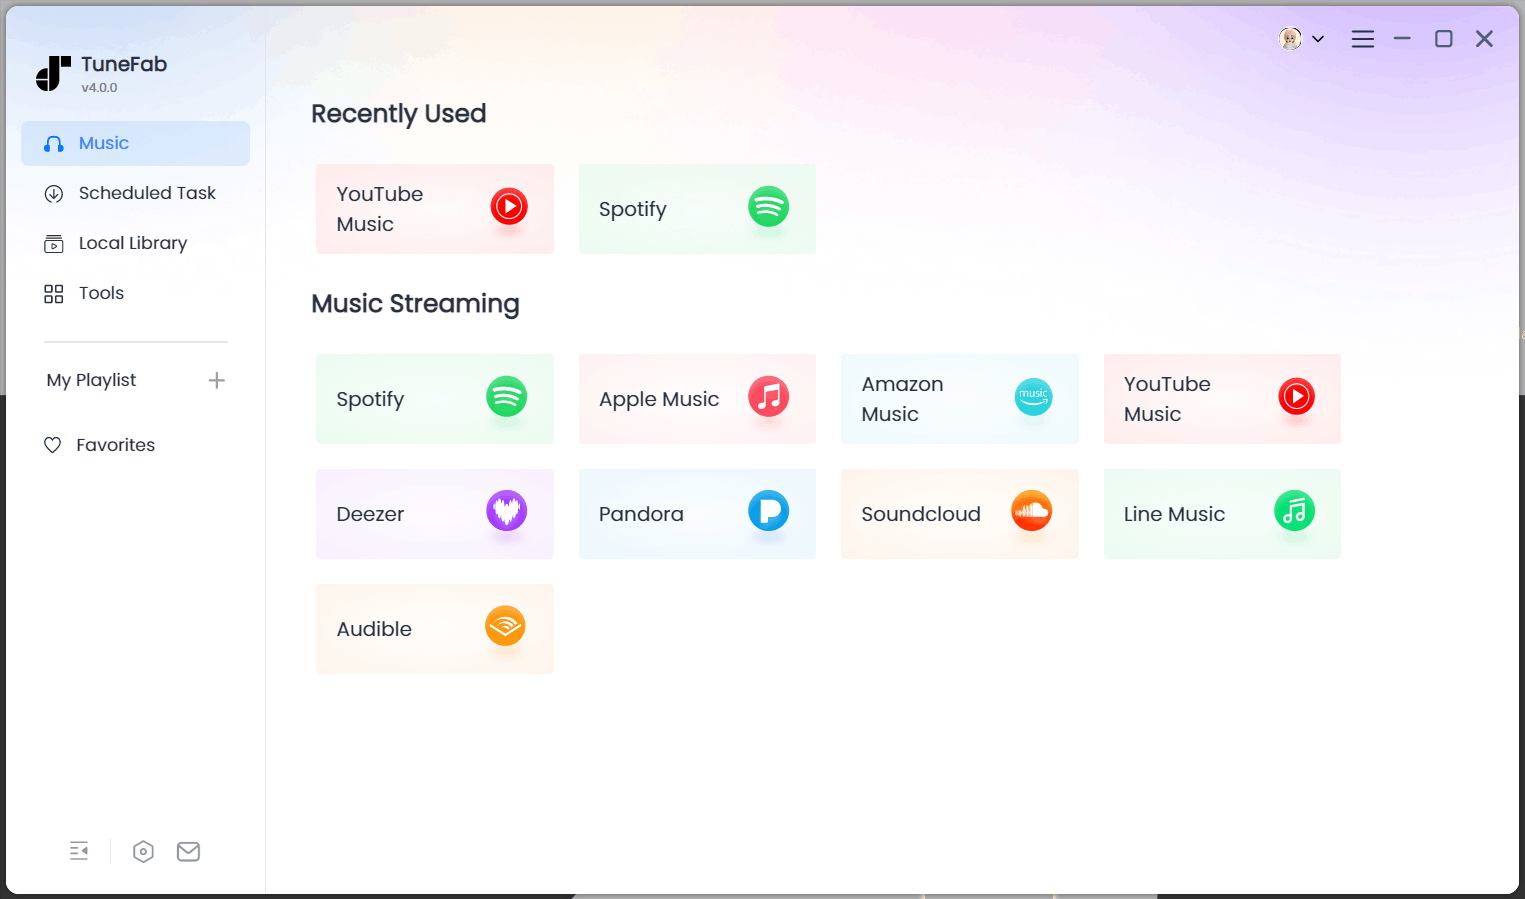
Step 1. First, download and install TuneFab Apple Music Converter on your Windows or Mac. Then, open the program and click on Apple Music. Although logging in is not required, doing so makes the conversion go more smoothly and reliably.
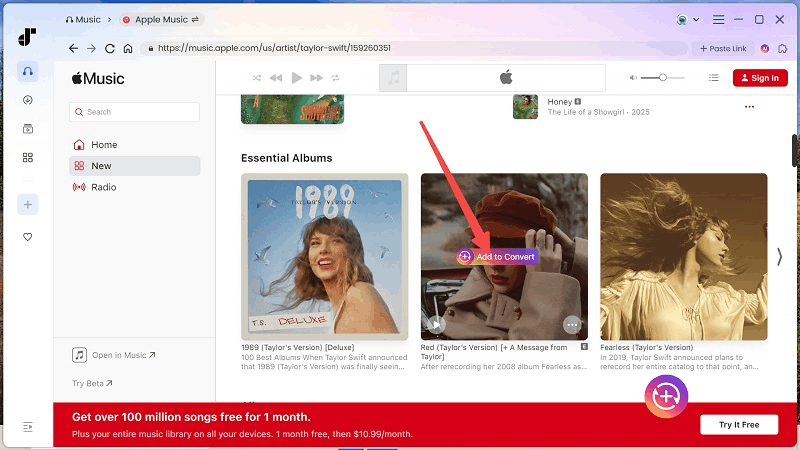
Step 2. Choose the Apple Music songs you want to burn to CD. Add them to the conversion list by clicking the "Add" and "Add to Convert" buttons.
Step 3. Select the output format, bitrate, and sample rate for each song. Click "Apply to Setting" if you want the same audio settings for all songs. To ensure the best quality, choose WAV or FLAC as the output format, with a bitrate of 320kbps and a sample rate of 48000Hz.

Step 4. After completing all settings, click the "Convert Now" button to start converting your Apple Music songs as WAV or FLAC format. Once completed, the files will be stored in the destination folder. Then, you can burn your lossless Apple Music songs to CD.
Burn Converted Apple Music to CD
After downloading Apple Music songs as local audio files on your computer, the next step is to burn Apple Music to a CD using iTunes or the Apple Music app, as we've mentioned before, or try VLC, Burn, Windows Media Player, and ImgBurn. Keep reading to find which one works best to burn Apple Music albums to CD.
Burn Apple Music to CD via VLC (Windows & Mac)
VLC (VideoLAN Client) is a free and widely-used media player known for its ability to play a variety of multimedia files, including audio and video formats. Its user-friendly interface and additional CD-burning features make it a handy all-in-one solution for media playback and CD burning. Also, it works on both Windows and Mac devices, so you can easily burn CDs from Apple Music downloads on your computer.
Step 1. Insert a blank CD into the disc drive. Download and launch the VLC player on your computer.
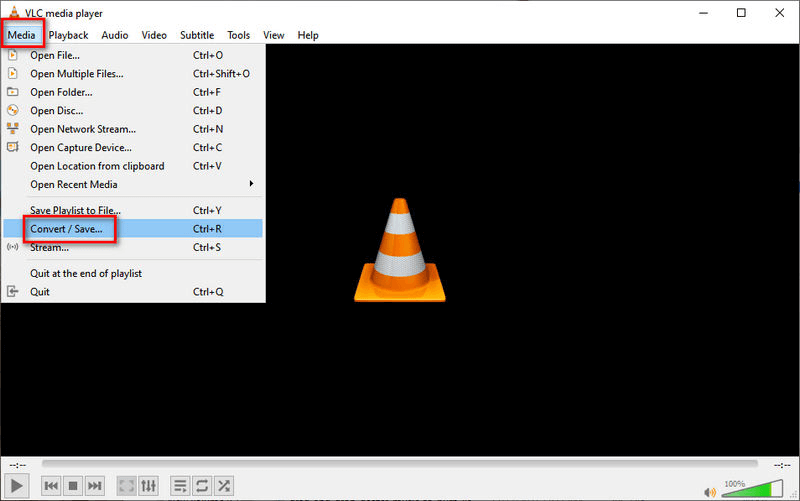
Step 2. Click Media in the upper left corner to open a drop-down list where you choose Convert/Save.
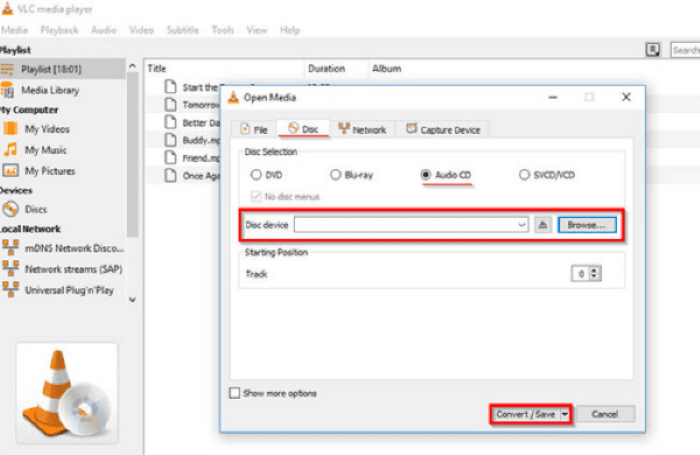
Step 3. An "Open Media" window will appear. Click the Disc tab at the top. Check the Audio CD box. Click Browse to select the CD drive. Click Convert/Save.
Step 4. Then, the Convert screen will appear. Click the tool icon to choose MP3 as the desired format and click Save.
![]()
Step 5. Click the Browse button to add the folder that stores your converted Apple Music songs. The final step is to hit the Start button to start burning Apple Music songs into a CD.
Burn Apple Music Songs to CD via Media Player (Windows)
If you mainly use a Windows PC, there actually is a default Apple Music to CD transferring tool available for you to burn Apple Music to CD without installing other software anymore, which is Windows Media Player. As the software will not be difficult to use, and it is completely free of cost, you can open it and just start burning music to CD from Apple immediately. Now, read the steps and see how to do it.
Step 1. Insert the blank CD. And launch Windows Media Player.
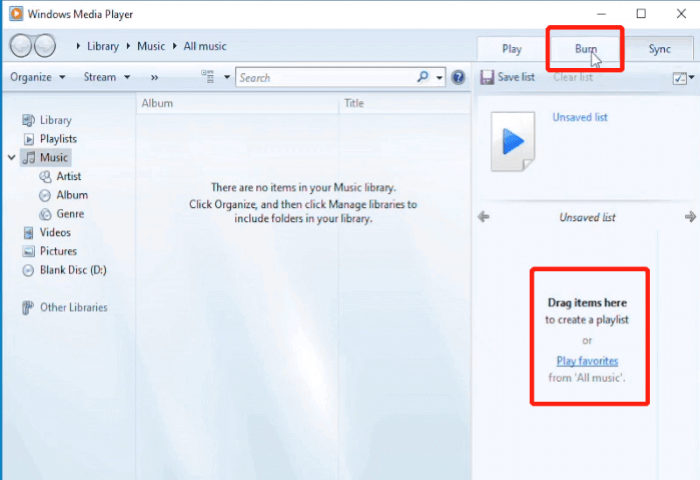
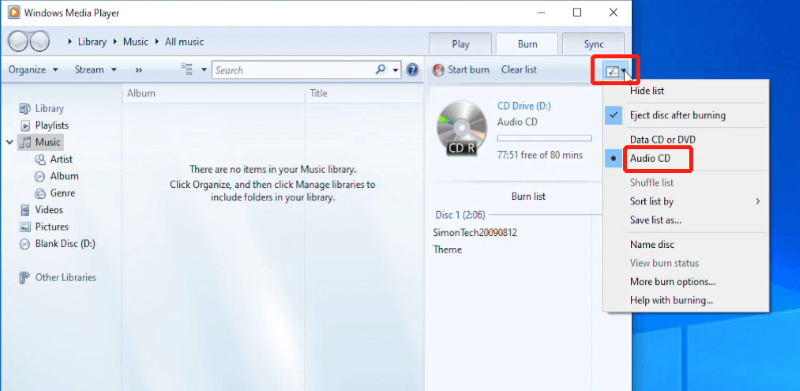
Step 2. Go to the Burn tab. Open the music folder that stores previously converted Apple Music songs, then drag and drop them to the burning list on the right side.
Step 3. Click the "√" icon to open a drop-down list where you can make sure Audio CD is selected.
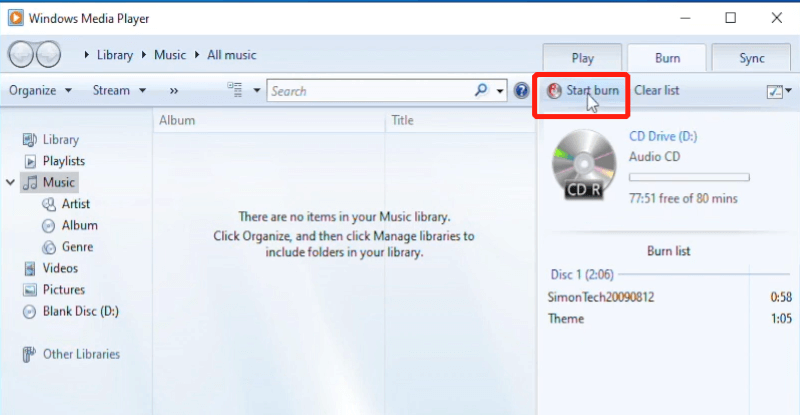
Step 4. Click Start Burn. Once the burning process is finished, Apple Music songs will be stored in the CD.
Burn Apple Music Songs to CD via ImgBurn (Windows)
In addition to using iTunes, there are other professional apps that are helpful when it comes to burning Apple Music to CD on Windows, one of which is ImgBurn which supports lots of audio formats such as AAC, APE, FLAC, M4A, and MP3. Besides CD, you can also burn files to DVD, HD DVD, or Blu-ray on this tool. Moreover, it's totally free to use. Here's how to burn a CD from Apple Music with this free CD-burning program on Windows.
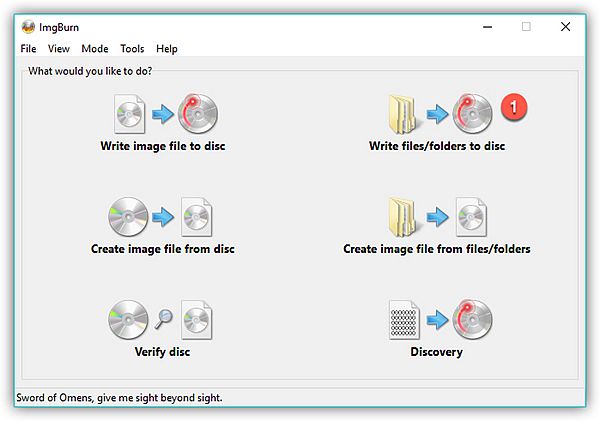
Step 1. Download ImgBurn, get it running, and select "Write files/folder to disc" from the main interface.
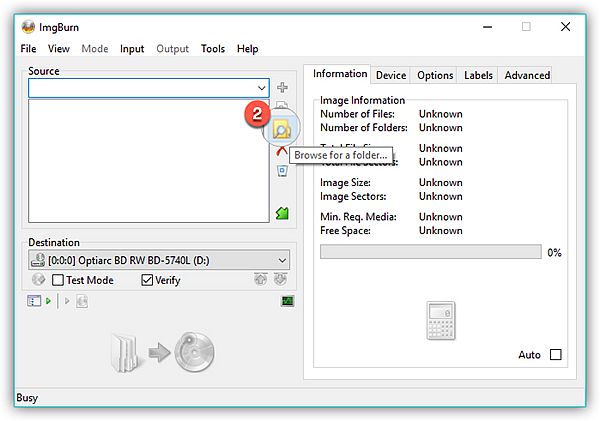
Step 2. Click Browse for a folder to import a bunch of Apple Music files at a time. You can save all the songs you want to burn onto a disc in the same folder.
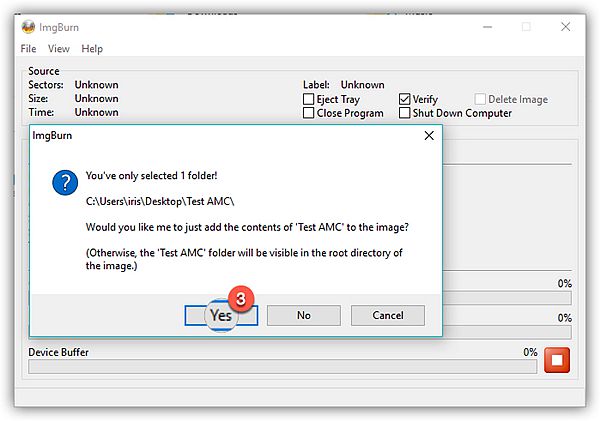
Step 3. Hit the Folder-to-Disc button to start creating your own CD. You will see a pop-up window. Click Yes to continue.
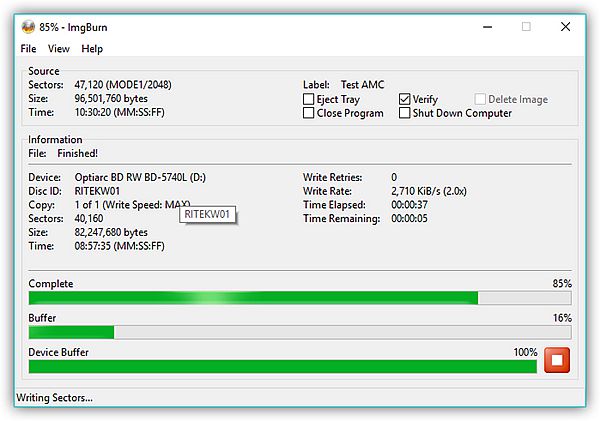
Wait until burning is completed. After that, you can play Apple Music on a CD with your car CD player.
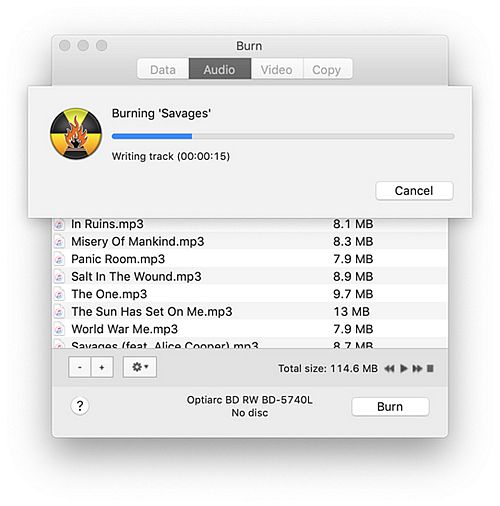
Burn CDs from Apple Music Playlist via Burn (Mac)
After downloading Apple Music tracks on your Mac computer using TuneFab Apple Music Converter, there are also other excellent programs to burn Apple Music to CD Apart from iTunes and the default Apple Music app. The app Burn is an easy-to-use tool that can help. Supported by macOS 10.9 or higher, it's safe and open source that offers CD-Text and mp3 tag editing features, definitely a decent choice for CD burning.
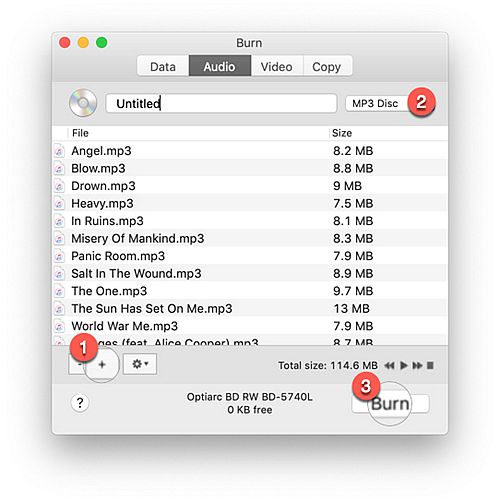
Step 1. Run Burn on Mac then you can see the main interface as below.
Step 2. Choose Audio and click the "+" button to add your music files to the program. Next, select MP3 disc or Audio CD as the CD type from the upper right corner, then click Burn to continue.
Step 3. Then a window will pop up to ask you to select the Speed where you can choose Maximum Possible (2X) and click Burn to start burning Apple Music playlists to the CD.
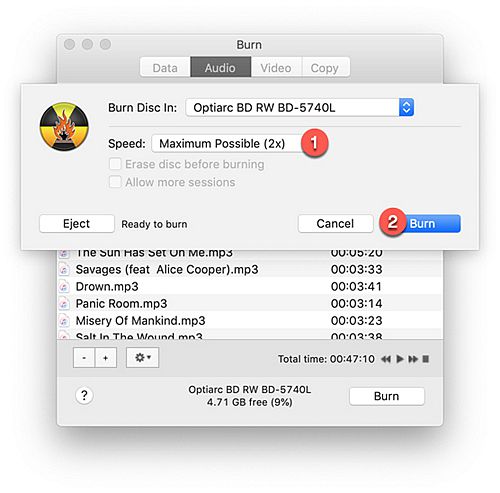
After a few minutes, Apple Music tracks will be successfully added to a CD and you can enjoy Apple Music on any CD player with ease.
Related Articles:
Troubleshooting: Why Can't I Burn Apple Music to a CD?
Even if you follow the correct steps, you may still encounter issues when trying to burn a CD. Below are the most common problems and how to fix them.
"Burn Playlist to Disc" Is Greyed Out
If the "Burn Playlist to Disc" option is unavailable, it usually means that at least one track in your playlist cannot be burned. The most common cause is that the playlist contains subscription-based Apple Music tracks labeled as "Apple Music AAC audio file". Even if these songs are downloaded, they remain restricted and cannot be written to a disc. In some cases, the issue may also occur if certain files are still stored in the cloud or if your computer is not properly authorized.
To check what is blocking the burn process, switch to View > as Songs and enable the "Kind" column. Review each track carefully. Only file types such as "Purchased AAC audio file" or "MPEG audio file" can be burned directly. If even one non-burnable file is included, the burn option may be disabled for the entire playlist.
No CD Drive on MacBook? Here's What to Do
You may notice that one playlist can be burned successfully while another cannot, even though both appear to contain downloaded songs. The difference usually comes down to ownership. Downloaded Apple Music tracks are still subscription-based and remain restricted, which means they cannot be written to a disc. In contrast, songs that you purchased from the iTunes Store or imported from CDs are treated as local files and can be burned normally.
To avoid confusion, do not rely on the download icon alone. Instead, check the "Kind" column to confirm the file type of each track. If necessary, remove subscription-based tracks from the playlist, purchase individual songs from the iTunes Store, or convert streaming tracks into standard audio files before attempting to burn the CD again.
No CD Drive on MacBook? Here's What to Do
Many modern MacBooks and Windows laptops no longer include built-in optical drives, which means you cannot insert a disc directly. In this case, you will need an external USB CD or DVD drive. These drives function just like internal optical drives and are typically plug-and-play. Once connected, insert a blank CD-R and the Music app, or iTunes should recognize the disc automatically.
If the disc is not detected, make sure the drive supports CD writing rather than read-only playback, confirm that the disc is unused, and check that the USB connection is stable. After the drive is properly recognized, you can follow the standard burn steps described earlier to create your CD.
FAQs About Burning Apple Music to CD
Can you burn songs from Apple Music to a CD?
You cannot directly burn Apple Music subscription tracks to a CD because they are DRM-protected. However, you can burn songs that you purchased from the iTunes Store or imported from CDs. Subscription tracks must first be converted into standard audio files before burning.
Why can't I burn a playlist to CD on Apple Music?
If the "Burn Playlist to Disc" option is unavailable, your playlist likely contains non-burnable file types such as "Apple Music AAC audio file". Even one subscription-based track can disable the burn option for the entire playlist. Check the "Kind" column to verify each file type.
Why won't my Mac let me burn CDs?
Modern MacBooks often do not include built-in CD drives. If your Mac does not recognize a disc, you may need an external USB CD or DVD drive. Also, ensure that the disc is a blank CD-R and that all tracks in the playlist are eligible for burning.
Do I lose my music if I cancel Apple Music?
Yes. Apple Music subscription tracks are only accessible while your subscription is active. If you cancel, downloaded songs will no longer play. Purchased songs and locally stored files remain accessible.
What is the best format for burning Apple Music to CD?
For Audio CDs, WAV or AIFF are ideal because they maintain high/lossless audio quality. However, standard Audio CDs are limited to 16-bit, 44.1 kHz audio, so higher-resolution files will automatically be converted during the burn process. For MP3 CDs, high-bitrate MP3 files are sufficient and more space-efficient.
How many songs can fit on one CD?
A standard Audio CD holds about 74 to 80 minutes of music. The number of songs depends on their length. If you create an MP3 CD, you can fit significantly more tracks, depending on file size and disc capacity.
Final Words
Burning Apple Music to a CD is still possible, but the method depends on what type of songs you have. If you purchased the tracks or imported them as local files, you can use the built-in Music app or iTunes to create a CD directly. However, if your playlist contains Apple Music subscription tracks, they must first be converted into standard audio files before they can be burned.
For users who want to create a personalized CD for a car stereo, prepare a physical backup, or make a meaningful music gift, TuneFab Apple Music Converter provides a practical way to convert streaming tracks into CD-compatible formats. Once converted, you can burn them just like regular music files.
If you need a simple and reliable way to burn Apple Music to CD without limitations, download TuneFab and start creating your disc for offline playback right away!

TuneFab Apple Music Converter
One click to download songs from Apple Music to burn them to CDs easily!
