

How do you share iTunes content with other devices? Most of you may use Home Sharing. It's very easy and convenient to share and stream contents from your computer's iTunes library to other computers, iOS devices and Apple TVs with Home Sharing. But some iTunes users are unable to turn on Home Sharing and asking "Why my Home Sharing is not working? How to fix it?" Well, it could be caused by many factors, I hereby list ten solutions for you.
Method One: Ensure Home Sharing Is Enabled on Your Devices
First of all, make sure Home Sharing has already been enabled on your devices. To check that, you need to follow the below steps:
1) For Mac users: Launch iTunes and click on "File" option and go to "Home Sharing", then select "Turn on Home Sharing" in the menu bar.
2) For iPhone, iPad or iPad touch users: Click on "Setting" button > Music or Settings > Videos, then switch the Home Sharing toggle to on position.
3) For Apple TV(4th Generation) users: Go to Settings > Accounts > Home Sharing, then turn on Home Sharing.
4) For Apple TV(3rd Generation or earlier) users: Go to Settings > Computers.
Method Two: Update All Software
If Home Sharing is enabled on your devices, then try to update all software.
1) For Mac users: Open the App Store on Mac and click on Updates tab to check whether you have any outstanding updates.
2) For PC users: Open both Windows Update and Apple Software Update to see if you need to update.
3) For iPhone, iPad or iPad touch users: Go to Settings >> General >> Software Update, check if there are any updates to be installed.
Method Three: Use the Same Apple ID Across All Your Devices
For Home Sharing, it's necessary for you to use the same Apple ID across all your devices. Therefore if you don't see any shared iTunes libraries on your Mac, iOS device or Apple TV, then you need to check whether you have used the same Apple ID.
1) For Mac or PC users: Open iTunes and click on "File" button and select "Home Sharing". If you want to change the Apple ID for Home Sharing, then choose "Turn Off Home Sharing" and set up Home Sharing again.
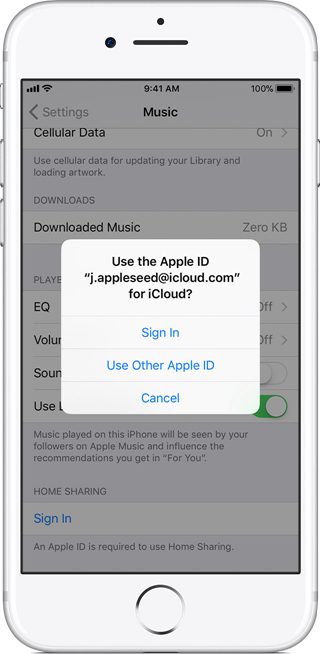
2) For iPhone, iPad or iPad touch users: Click on "Settings" and then "Music" button. Tap "Sign In" to use the Apple ID you are currently signed in with or tap "Use Other Apple ID" to sign in with a different Apple ID.
3) For Apple TV(4th generation): Go to Settings > Accounts > Home Sharing and then sign in with your Apple ID.
4) For Apple TV(3rd Generation or earlier): Go to Settings > Computers.
Method Four: Wake Your Mac or PC and Open iTunes
If your devices isn't awake, then you will be unable to turn on Home Sharing. Hence you need to make sure that the computer and iTunes are awake. If you have opened iTunes, then quit and reopen it.
But if you are using a Mac with an Apple TV, then go to System Preferences > Energy Saver. Select Wake for Wi-Fi network access.
Method Five: Check Your Network Connection
There is no doubt that if your devices doesn't connect with the same Wi-Fi network, your Home Sharing won't work. But if all your devices are on the same Wi-Fi, then you need to make sure that none of your devices are connected to a VPN or another kind of internet intruding service. Besides, if you have a guest network, check whether all of your devices are on the same guest network.
Method Six: Restart and Update Your Router
Actually, sometimes you may find that restart can work for all problems, so try to restart and update your router. Turn off your router and then reopen it. If you are using an AirPort or Time Capsule, then check for firmware updates. To use a different router, you can contact the manufacturer for help.
Method Seven: Check Security Settings
Sometimes your security setting such as firewall could potentially be hindering your access to Home Sharing. To check that, go to "System Preferences" and "Security&Privacy, then open the "Firewall" tab. Just edit these settings to make sure none of them will block your Home Sharing when opening the Firewall Options.
Method Eight: Add or Deauthorize a Device for Home Sharing
As Home Sharing can be set up on up to five computers, so check if you have already set up five computers. If you can't use Home Sharing because of that, then deauthorize one or more of your computers in iTunes for adding another computer. Just go to Account or Store and select "Deauthorize This Computer".

Method Nine: Check Your Router Settings
As Home Sharing relies on TCP port 3689 and UDP port 5342, so you need to ensure that these ports needed for Home Sharing aren't being blocked.
Method Ten: Transfer the iTunes content via USB
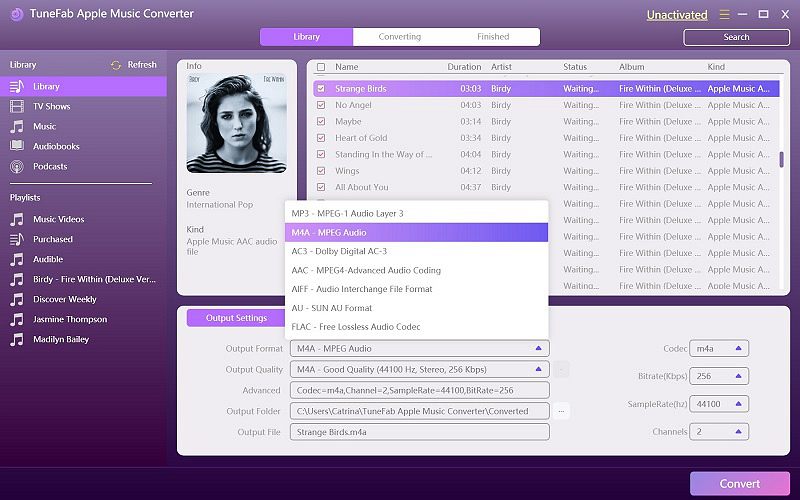
If you have tried all of the methods mentioned above, but you can't still used Home Sharing, then you may need to try the last method: Transfer the iTunes content via USB. It may be a little complex, but it does help you share iTunes contents with other devices. Considering that iTunes contents are protected with DRM, therefore before transferring, you need to download a reliable converter. TuneFab Apple Music Converter is exactly what you need as it can help you remove DRM protections from Apple Music, iTunes purchased M4P songs, iTunes M4B audiobooks and Audible AA/AAX audiobooks with a few steps. That means you can also play Apple music on Dropbox and convert Apple Music to generic MP3 player.
If you find Home Sharing isn't working, then try the solutions mentioned above, I hope one of them can help you solve the problem. If you can't fix it, then you can try the last solution which certainly fix it, but don't forget to download the reliable Apple Music DRM removal software, TuneFab Apple Music Converter first.
