

How do you share your purchased items from iTunes, iBooks and App Store? How to locate and find your family member's missing iOS device? To make things easy, Apple provided an efficient feature called Family Sharing in 2014 with iOS 8. By setting up Apple Music Family sharing, up to 6 family members can use different Apple IDs to share calendars, photos, movies, TV and music. Therefore, why not sign up and activate an Apple Music family plan for conveniently sharing purchases? Go ahead, I'll show you how to do that.
Don't Miss:
Solutions for
Apple Music Family Sharing Not Working
How to Convert Apple Music to MP3 (2023 Ultimate Guide)
Part 1. Features of Apple Music Family Plan
Apple Music Family Plan allows you to share your favorite songs, playlists and albums with your family in an easy way. Here are some features of Apple Music Family plan:
#1. Find out songs that your family members have purchased through this service.
#2. The Family plan enables 6 people to join the family group, that means 6 people can enjoy songs from Apple Music with only $14.99 per month. Therefore it's much more cost-efficient than Individual plan.
#3. Moreover, once you set up Family Sharing, family group members are free to share iTunes, Apple Books, App Store purchases and an iCloud storage plan without using the same Apple ID.
As Apple Music Family plan is such efficient so that why not set up Family Sharing right now?

Part 2. How to Set Up Apple Music Family Sharing
It's not difficult to set up Apple Music Family Sharing, what you need to is to change your subscription to Apple Music Family plan and then set up Family Sharing on your devices.
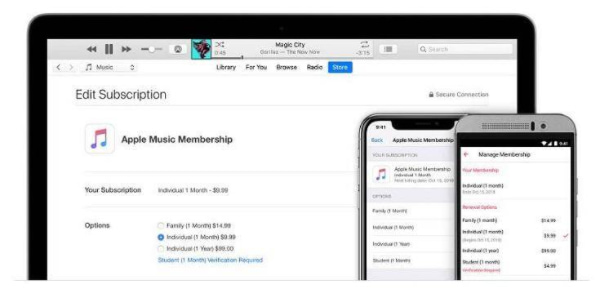
How to Set Up Apple Music Family Plan?
If you have subscribed to Apple Music Individual plan or Student plan, then you may need to change to Family plan.
On iPhone, iPad or iPod touch: First, go to "Settings" section > [your name] > "iTunes & App Store" option, then click on your Apple ID and "View Apple ID" option. Next, go to "Subscriptions" and "Apple Music subscription". At last select Family plan.
On Android device: Go to Apple Music app and click on three-horizontal-line-shape button in the upper-left corner, then go to "Settings" > "Account Settings" > "Mange Membership". Finally, change to Family plan.
On Mac or PC: On iTunes, go to "Account" > "View My Account" and then click on "Manage" and "Edit" to change to Family plan.
How to Set Up Family Sharing?
Now you can get started on setting up Family Sharing, but before that, you may need to make sure other family group members have their own Apple ID, if not, then help them to create a new Apple ID first. You can invite up to five people to your family group.
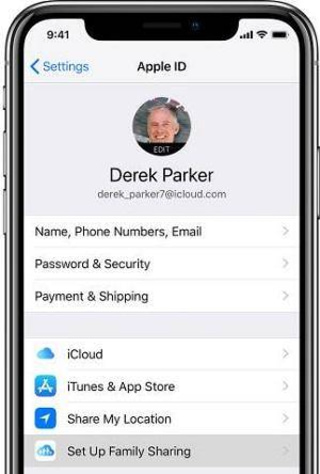
Step 1. Start a Family Group
On iPhone, iPad or iPod touch: Go to Settings > [your name] > Set Up Family Sharing > Get Started.
On your Mac: Go to Apple menu > System Preferences > iCloud > Set Up Family.
Step 2. Invite People to Join Your Family Group
Only for those who use iOS 8 and later or OS X Yosemite and later can add anyone who has an Apple ID to your family group.
On iPhone, iPad or iPod touch:Go to Settings > [your name] > Family Sharing, then click on "Add Family Member" option and enter your family member's name or email address and send your invitation.
On your Mac: Go to Apple menu > System Preferences > iCloud, then click on "Manage Family" and "+" button to send them an invitation.
Step 3. Check if Your Family Member Accepted the Invitation
As you have already sent your invitation, so now it's time to check whether your family member accepted your invitation. To do that, go to "Family Sharing" on your iOS devices or "Manage Family" on Mac, then select the member's name to check its status of the invitation. But if the member hasn't accepted the invitation for a long time, you can resend the invitation by clicking on "Resend Invitation" button.
How to Join a Family Group?
If you receive an invitation sent to you by email or text message, then you need to respond from the invitation. But if you miss the invitation, then you need to:
On iPhone, iPad or iPod touch: Go to Settings > [your name] > Invitations and then accept the invitation.
On your Mac: Go to Apple menu > System Preferences > iCloud > Manage Family and then accept the invitation.
Note: You are only allowed to join one Family Group, so I recommend that you accept the invitation carefully.
Once your family members accept your invitation, you can start to share purchased Apple Music tracks, playlists and albums with your family group members. In addition to that, you can also share family photos, videos and Family calendar. Therefore just get started on setting up Apple Music family sharing by following the steps above.
