

Amazon Music is a popular music streaming service that allows you to listen to millions of songs from your favorite artists, bands, and genres. Besides, you can also make playlists on Amazon Music on which you can add your favorite songs. However, quite a few people seem to have trouble creating a playlist on Amazon Music. So, how to create a playlist on the Amazon Music app?
In this guide, we'll tell you the steps of creating a playlist on Amazon Music on desktop and mobile devices, including Windows, Mac, Android, iOS, and even Alexa. Additionally, we will also teach you how to download an entire playlist as local MP3 files so that you can enjoy your favorite tracks offline. So, let's get started and create a playlist that you can't stop listening to!
People Also Read: Best Amazon Music Playlists of the Year
- Can You Make Playlists on Amazon Music
- How to Create A Playlist for Amazon Music on Windows/Mac
- How to Create an Amazon Music Playlist on Android
- How to Create a Playlist on Amazon Music on iOS
- How to Create Amazon Music Playlists on Alexa-enabled Devices
- Bonus: How to Listen to an Entire Playlist without Subscription
- FAQs About Amazon Music Playlists
Can You Make Playlists on Amazon Music
YES, only when you're an active subscriber with an Amazon Prime membership (Student included), or under a 30-day Amazon Prime free trial. As for a free listener, then the answer is NO. What's more, it's important to note that there is a limit of up to 2,500 songs in each playlist. Also, make sure that "Online Music" is enabled under "Library" if you want to sync your playlists across your devices.
How to Create A Playlist for Amazon Music on Windows/Mac
After subscribing to Amazon Prime membership, you can play any song on-demand from a selection of your personal playlists. If you have no idea how to get this done, let's grasp the idea of how to create a playlist on the Amazon Music App for Windows and Mac.
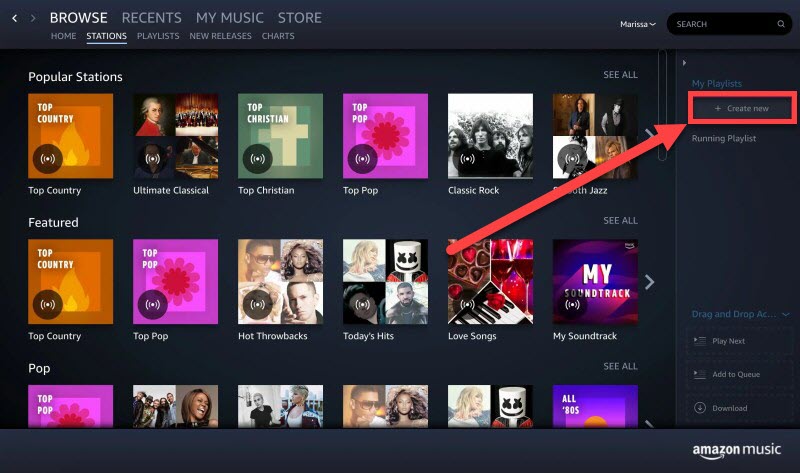
Step 1. Open the Amazon Music app on your Windows/Mac, then, click the "Create Playlist" button on the right. (The button will be on the left if you're listening on the web player.)
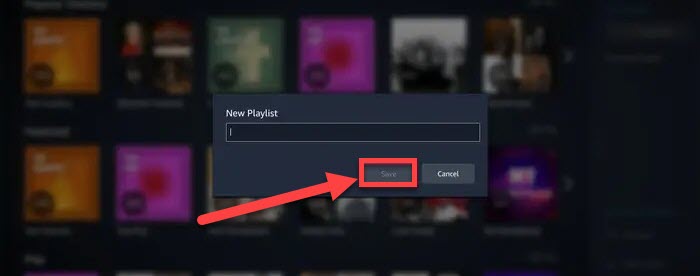
Step 2. Name your playlist and click the "Save" button to create an empty playlist.
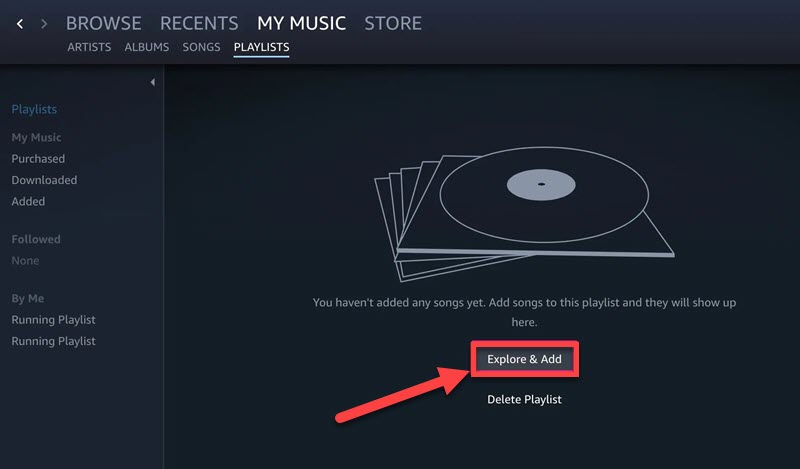
Step 3. Click the "Explore & Add" button to start searching and adding songs to the playlist.
Note: TuneFab Amazon Music Converter can help you one-click download Amazon Music playlists for high-res offline playback, and the downloaded songs will be always available even after the subscription has expired.
How to Create an Amazon Music Playlist on Android
For Amazon Music users who primarily use their Android devices for listening to music, creating a playlist on Amazon Music for Android is a simple process that can be done within the app itself. Just follow the 5 steps below.
Step 1. Open the Amazon Music app and go to "LIBRARY" > "Playlists".
Step 2. Next, click "New Playlist" and enter a name for your new playlist before tapping "Save".
Step 3. If you want to make your playlist public, select the overflow menu and click "Make Playlist Public."
Step 4. To change the order of songs in a playlist, go to the "Library" section and tap the menu next to the playlist you want to edit.
Step 5. Finally, select "Edit" and drag and drop the songs in the desired order.
How to Create a Playlist on Amazon Music on iOS
If you are not an Android mobile user but an iOS user, you might be wondering how to create a playlist on Amazon Music for iOS. Just like with Android devices, creating a playlist on Amazon Music for iOS is a simple and straightforward process. Check these 4 steps!
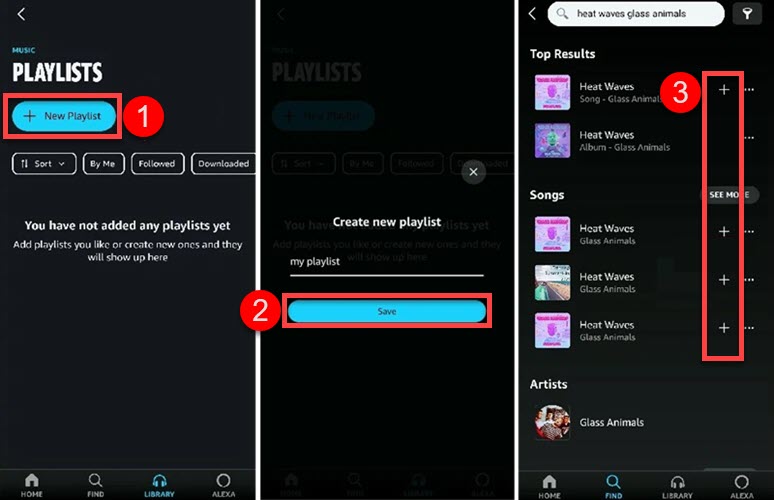
Step 1. Navigate to the "My Music" tab and switch to "Playlists" on the Amazon Music app.
Step 2. Click on the "Create New Playlist" button to initiate the playlist creation process.
Step 3. Type in a name for your playlist when the pop-up appears, and press the "Save" button to finalize.
Step 4. Choose the songs, albums, or artists you want to include in your playlist by tapping the "+" button.
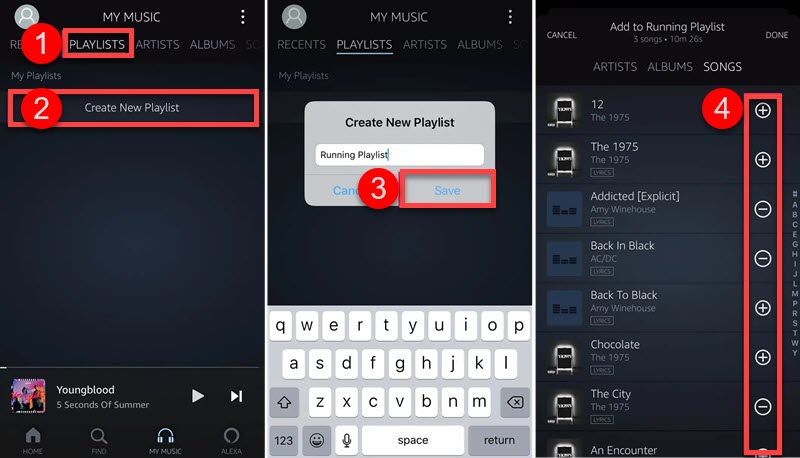
Note: You can directly create a new playlist when you're playing a song by taping the "…" behind the song > "Add to Playlist" > "Create New Playlist" > Save it after entering a name.
How to Create Amazon Music Playlists on Alexa-enabled Devices
If you happen to have Amazon Alexa in your smart home, then you can integrate this virtual assistant with Amazon Music and listen to your favorite songs by voice. Meanwhile, you can create playlists and then play Amazon Music on Alexa after you connect the service to Alexa. Here's how it works.
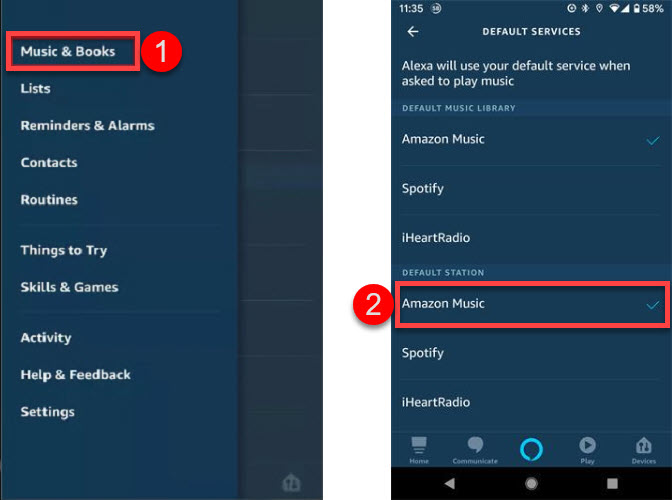
Step 1. Open the Alexa app on Android/iPhone, and tap "≡" to show the menu.
Step 2. Tap "Music & Book" and select "Amazon Music".
Step 3. Now, choose "My Music" > "Playlist" > "Create Playlist".
Step 4. Enter a name and "Save" it. Then, add your favorite tunes to the playlist.
Note:you can say "Create a playlist" to Alexa as well after linking Amazon Music to it.
Bonus: How to Listen to an Entire Playlist without Subscription
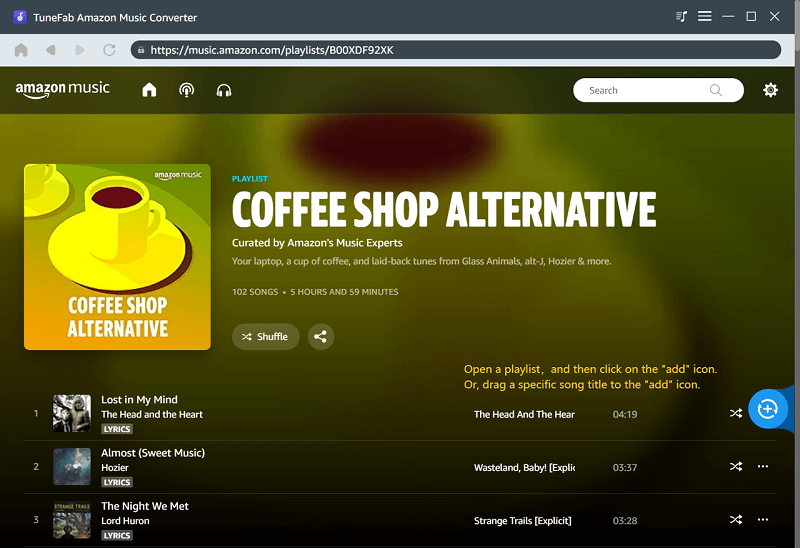
After creating your playlists on Amazon Music, instead of paying endless subscriptions for listening to Amazon Music songs offline, you can use TuneFab Amazon Music Converter to enjoy your songs offline whenever you want.
TuneFab Amazon Music Converter is a remarkable helper that enables you to download Amazon Music songs to MP3, M4A, WAV, FLAC, etc., and then enjoy offline playback forever without a subscription. While only Amazon Music Unlimited subscribers can download any songs (Amazon Music Prime subscribers can only download All-Access Playlists of up to 50 songs for each), this is no doubt the best solution to download all Amazon playlists with unlimited songs in a click.
Don't Miss More Amazing Features
● CD Music Quality - Keep the best playback experience with up to 320kbps/48kHz.
● Batch Download - Download multiple songs and playlists at a time and allow for unlimited downloads.
● Ultra-Fast Speed - Accelerate the download process up to 5X faster than ever.
● DRM Removal - Strip off DRM protection and enable free transfer or sharing.
● Metadata Preservation - Keep all ID3 tags to easily manage your personal library.
● Ease of Use - Build in a web player to lead you through the entire process.
Even if you're a free listener, you can still follow the tutorial to convert Amazon Music playlists to MP3.
Step 1. Download and install TuneFab Amazon Music Converter, then open it on your computer and sign in to your Amazon account.
Step 2. There are two ways to add a playlist/album/song/podcast for Amazon music conversion to the conversion list: click the blue "+" button or drag and drop the target to the blue "+".
Step 3. Open the conversion list, select the output format and output folder, and click "Convert All" to start the conversion. In the upper right corner, you can choose to convert all files to MP3
If you want to convert a song to another audio format, click on the "Output Format" next to the song. You can also choose a format for it.
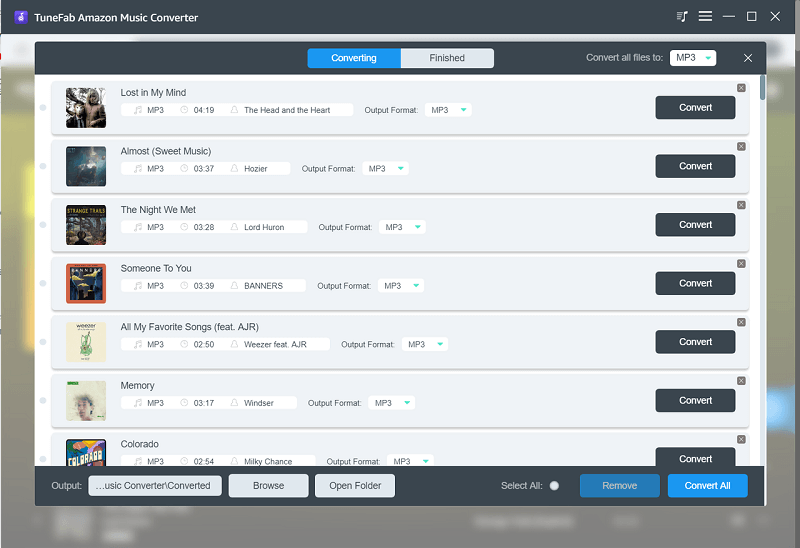
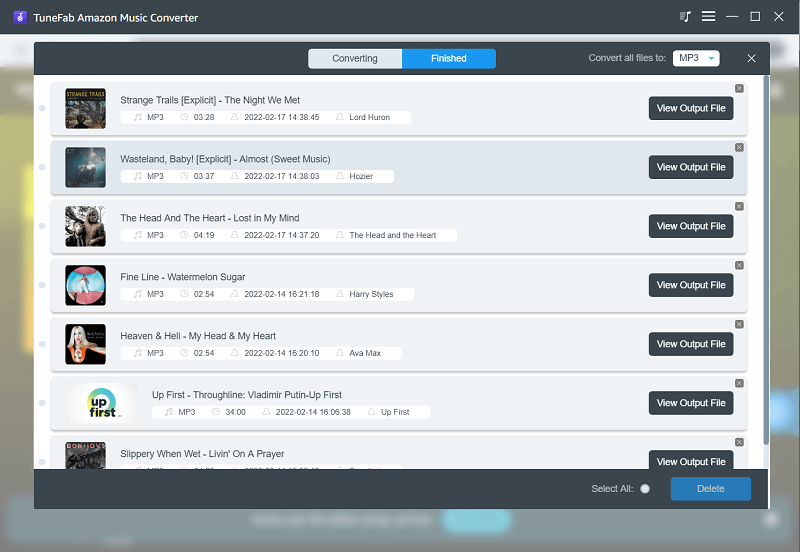
Step 4. After your Amazon music playlist conversion is complete, you can view the converted files in the "Finished" tab. Now you can enjoy your Amazon Music playlists for free forever!
FAQs About Amazon Music Playlists
Q1: Can you play songs on demand on Amazon Music?
Yes, but this may vary based on your subscription. Both Amazon Music free users and Amazon Music Prime users can just play songs on shuffle, but the latter can pick and play songs on-demand in All-Access Playlists. If you subscribe to the Amazon Music Unlimited membership, then you can enjoy on-demand streaming and offline listening without skip limits.
Q2: How do I add songs to my Amazon Music playlist?
In an empty playlist on the Amazon Music app, you can click the "Explore & Add" option to add songs to your playlist. If there is an existing playlist, you can select the "…(More)" option next to a song and choose "Add to Playlist". After that, choose the desired playlist. That's all done.
Conclusion
How to create a playlist on Amazon Music? You'll need to make sure that you're an active subscriber, and then follow the tutorials here to get it done. However, please note that only Amazon Prime Unlimited subscribers can download personal playlists.
In this case, TuneFab Amazon Music Converter works like a charm without a subscription to download unlimited songs from all your Amazon Music playlists to local storage. After that, you can listen to high-res songs anywhere at any time you like. Just go give it a shot!
