


"I just bought a new computer, can anyone tell me how to export music from iTunes to my new computer?"
If you’re switching to a new device or simply want to keep a backup, learning how to export iTunes songs to computer is essential. You may enjoy purchasing and organizing their favorite songs, albums, and playlists within the platform, but things get confusing when it comes to transferring those files outside of iTunes.
The good news is that iTunes offers several built-in options to help you move your library, and there are also third-party tools that make the process easier—especially if you want your songs in formats like MP3. In this guide, we’ll walk you through step-by-step methods to export iTunes music to computer and even share extra tips for transferring music to an iPhone.
Part 1. Export iTunes Music to Computer Officially (as Library Info)
Before exporting music from iTunes to computer or iPhone, you are supposed to install the latest version of iTunes on your computer and authorize your computer on iTunes. To download the latest version, you can go to Apple official website.
Solution 1: Export Playlists on iTunes
Step 1: Launch iTunes and sign in to your Apple account by entering the Apple ID and password.
Step 2: Next click on "File" option on the menu bar and go to "Library" and "Export Playlist..." option to export iTunes playlist to PC.
Step 3: From the pop-up window, you can choose a new location to save the music files. After that, click on "OK" button. By default, the exported playlist will be saved as XML file.
Step 4: If you want to export music from iTunes to another computer, you can transfer the exported iTunes playlist to another PC via a USB drive. All you need to do is to re-import the playlist to iTunes on your new computer manually.
Note: For those who want to play music from iTunes via a third-party media player other than iTunes, you are supposed to save as "M3U files". In addition to that, you can also export playlists from iTunes to a tab-separated plain text file.
Solution 2: Check "Copy files to iTunes Media folder when adding to library"
Step 1: Launch iTunes and sign in to your Apple account.
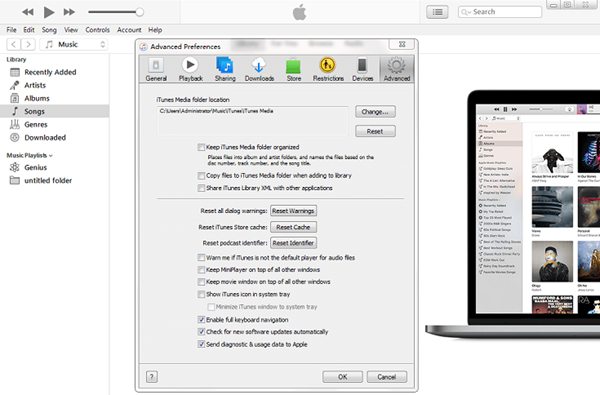
Step 2: Click on "Edit" > "Preferences" > "Advanced" options.
Step 3: On the "Advanced Preferences" window, tick the little box in front of "Copy files to iTunes Media folder when adding to library" option and then click on "OK" icon to save the change.
Step 4: After that, all your media files including songs, videos, playlists, etc. will be saved on an new iTunes folder. Then you can copy the music files to another computer via USB.
Solution 3: Back up and Restore Your iTunes Music Files
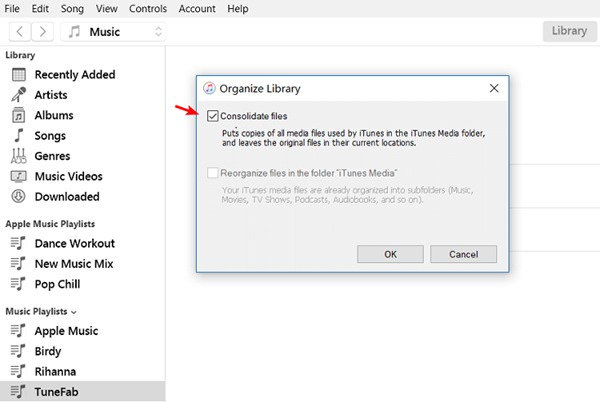
Step 1: Open iTunes, go to "File" > "Library" > "Organize Library" options and then check "Consolidate files" on the "Organize Library" window.
Step 2: By default, your iTunes music folder is saved in your iTunes folder.
For Mac users: Open the Finder file, then select your username in the left sidebar and find the music folder.
For Windows 7 or later users: Go to \Users\username\Music\.
For Windows XP users: Go to \Documents and Settings\username\My Documents\My Music\.
Step 3: Exit iTunes and then drag the iTunes folder to the external device to back up your library and media files.
Step 4: Drag the iTunes folder from the external device to another computer and then select it to restore your library.
Part 2. Export Music from iTunes to Computer (as MP3 Files)
The official method only lets you export iTunes information, not the actual music files. If you want to export your iTunes music to MP3, you’ll need a third-party tool. TuneFab iTunes Audio Converter is a great option that can convert your entire iTunes library or audiobooks into MP3, FLAC, M4A, and more. It not only preserves the original audio quality but also keeps ID3 tags intact. With playlist and album batch conversion supported, it’s definitely worth a try.
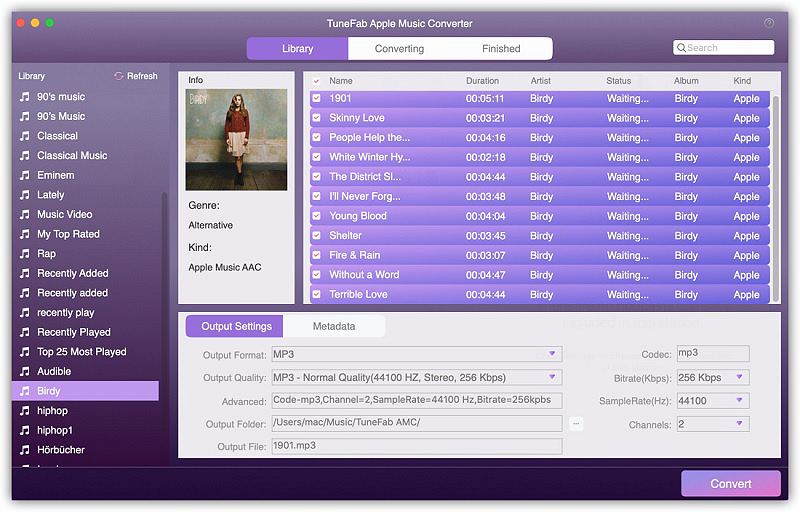
If you find syncing with iTunes troublesome, you can also use the updated version, TuneFab Apple Music Converter. This tool comes with a built-in Apple Music web player and direct access to your Apple Music library, including playlists. You can browse and download songs straight into MP3, M4A, or FLAC on your computer.
Please note: Make sure that TuneFab iTunes Audio Converter can properly download your iTunes songs to your computer before purchasing.
Now, let’s see how to export your iTunes music to your computer with TuneFab iTunes Audio Converter:
Step 1. Download, install, and launch the software.
Step 2. Select the iTunes music you want to convert by checking the boxes or searching from the search bar.
Step 3. Adjust the output settings: choose MP3 (or other formats) and set the output folder.
Step 4. Click “Convert” to start exporting your iTunes music. The songs will be saved as DRM-free files on your computer.
Part 3. Extra Tips - Export Music from iTunes to iPhone
Therefore if you want to move music from iTunes to your computer, then you can select one of the above methods. In addition to that, you may also want to know how to move music from iTunes to iPhone. Just see the below solution from Apple Support.
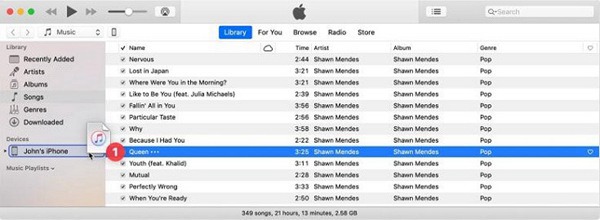
Step 1: Connect your iPhone to your computer via a USB cable.
Step 2: Launch iTunes and sign in to your Apple account. You can find your device's name on the Device section.
Step 3: Click on "Songs" option on the left sidebar, then all your songs from iTunes are shown on the interface.
Step 4: Directly drag the song to your device's name on the iTunes interface.
Note: If you can't export music iTunes to your iPhone successfully, that means you may not enable "Manually manage music and video" option. If so, you need to click on the device icon and go to "Summary" > "Options" section, then check "Manually manage music and video" option.
Besides, you can go to device's name > "Music" options, then check "Sync Music" and click on "Sync" button. After that, the existing media data on your iPhone will be replaced by the newly synced data.
Note:
1. If you have used a different computer to sync your iPhone before, then you need to go to your device > Summary > check "Manually manage music and videos" to sync.
2. Besides, you can set up syncing iTunes music to your iPhone over Wi-Fi. Just click on the device icon and go to "Summary" > "Sync with this [device] over Wi-Fi", then click on "Apply" icon. Your iPhone will sync automatically when it's plugged in to power and iTunes is open.
As you see, it's very easy to export music from iTunes to computer or iPhone by following the above methods. But if you use Android phone or tablet other than iPhone, then you can reference to another article: 5 Methods to Export iTunes Music to Android Phone or Tablet.
