

"Any way to 100% remove Apple Music from iPhone? I'm looking for how to delete music from iPhone, not iTunes."
Many people also scratch their heads over the same kind of problems on Reddit, Apple forums, or other platforms. Some have decided to stop using Apple Music, some want to free up storage, and others, especially iPhone newbies, have never removed any music from Apple Music on iPhone before.
Well, this article is here to help! This comprehensive guide is about how to remove Apple Music from iPhone, covering 5 easy and effective ways. As a bonus, we will also share a tip that helps you get rid of Apple Music from your iPhone but still keep your beloved songs forever, giving you total control of your music! Let's read on!
- 1. How to Delete Apple Music Songs/Albums/Playlists on iPhone
- 2. How to Remove Apple Music Downloads from iPhone
- 3. How to Find and Remove Duplicate Songs in Apple Music from iPhone
- 4. How to Uninstall the Apple Music App from iPhone
- 5. How to Remove Devices from Your Apple Music Account on iPhone
- Bonus Tip: How to Keep Apple Music Forever Before Removing from iPhone
- Conclusion
1. How to Delete Apple Music Songs/Albums/Playlists on iPhone
Sometimes you just want to clean up content you no longer like, such as songs you are tired of, albums you no longer vibe with, or those temporary playlists. This can help your collection be tidier and better tailored to your current listening preferences. Fortunately, it is really easy to delete such content from Apple Music on your iPhone! Here are the specific steps:
NOTE: If you have iCloud Music Library sync turned on for your Apple ID, any changes you make will automatically sync across all your devices. To avoid this, you can turn off the sync feature:
Go to "Settings" > "Music". Then, toggle off the "Sync Library" option.
Remove Individual Songs from Apple Music Library on iPhone:
It is a pity that there is no option offered to remove all songs from Apple Music library on iPhone with one click. Therefore, you need to manually delete the songs you no longer like. Here is how.
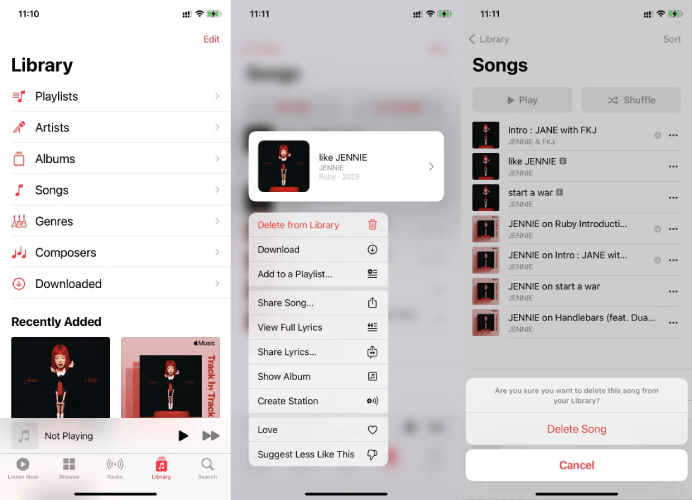
Step 1. Access the Apple Music app on your iPhone. To begin with, make sure you've logged in to your subscribed Apple ID.
Step 2. Head to the "Library" tab and select "Songs".
Step 3. Find the song you want to delete from the list.
Step 4. Tap on the three-dot icon, and then choose "Delete from Library" > "Delete Song".
Remove Songs from Albums/Playlists in Apple Music on iPhone:
Additionally, you can streamline the removal process by deleting the entire playlist or album. Here are the steps.
Step 1. Go to the logged-in Apple Music app.
Step 2. In the "Library" tab, select "Playlist" or "Albums" to see your collections.
Step 3. Tap on the target "Playlist" or "Albums".
Step 4. Hit the three-dot icon in the upper right corner, and then select "Delete from Library".
Step 5. Tap the popup "Delete Playlist/Album" option at the bottom to take effect. Then, you can effortlessly remove songs from Apple Music playlists on iPhone.

2. How to Remove Apple Music Downloads from iPhone
For those who prefer to download Apple Music songs for offline listening, have you noticed your iPhone storage filling up? High-quality music files typically also mean large file sizes, so they can take up a lot of space over time. If you want to free up storage, read on! We will walk you through how to remove Apple Music downloads on iPhone below:
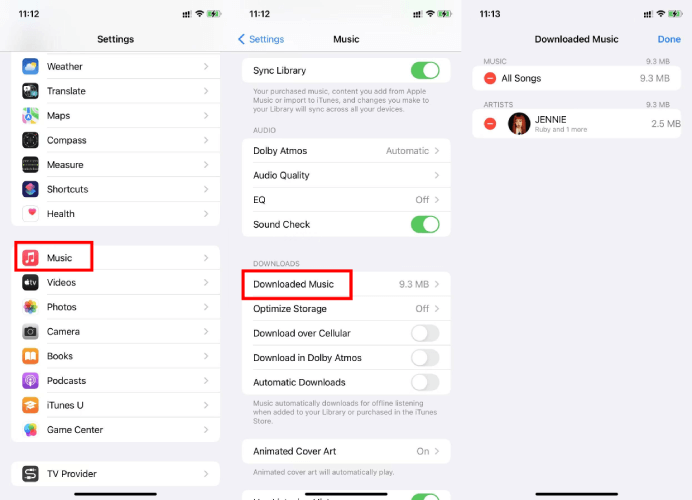
Step 1. Go to "Settings" on your iPhone. Then, tap on "Music".
Step 2. Under the "DOWNLOADS" section, select "Downloaded Music" to find all your downloaded Apple Music songs on your iPhone.
Step 3. Tap on the "Edit" at the top right. Now, you can easily hit the delete icon to remove Apple Music downloads on your iPhone to get more storage.
3. How to Find and Remove Duplicate Songs in Apple Music from iPhone
Duplicate songs in Apple Music not only clutter your playlists but can also eat up valuable storage space when you download them for offline listening. This is usually caused by adding the same song to multiple playlists or accidental duplication during sync.
While currently there is no one-click feature to identify duplicate songs, you can still remove duplicates from Apple Music playlists on iPhone manually. Here is how:
Step 1. Launch the Apple Music app on your iPhone.
Step 2. Tap "Library" > "Songs". All songs are sorted by the time they were added by default.
Step 3. Tap on the "Sort" option in the upper right to select "Title". Then, it will automatically sort out the music library by song title.
Step 4. Scroll down to find the duplicate songs in the list.
Step 5. Long-press the song or tap on the three-dot icon, and then select "Delete from Library" > "Delete Song".

4. How to Uninstall the Apple Music App from iPhone
If you decide to switch to other music streaming services and completely say goodbye to Apple Music, deleting the app is your go-to option. However, it is worth noting that the option to uninstall the Apple Music app on iPhones was officially introduced in iOS 14. For iPhones running older versions, you can only remove the Apple Music app from your home screen, not truly delete it. Below, we will explain how to make it for different iOS versions.
For iPhones with iOS 14 or Later:
Step 1. On your iPhone with iOS 14 or later, tap and hold the Apple Music app.
Step 2. Tap Remove App.
Step 3. Select "Delete App" to completely remove Apple Music from your iPhone. Or you can choose "Remove from Home Screen" to hide the Apple Music app, and you can still access it from the App Library.
For iPhones with iOS 13 or Earlier:
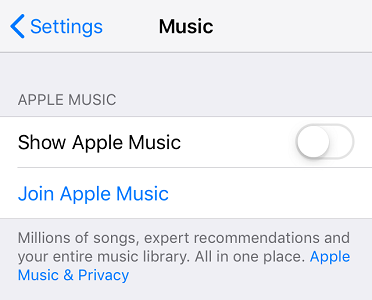
Step 1. Move to "Settings" on your iPhone.
Step 2. Scroll down to tap "Music".
Step 3. Toggle off "Show Apple Music". Then, you can successfully remove Apple Music from the iPhone home screen.
NOTE: Uninstalling the Apple Music app on iPhone doesn't mean your subscription is canceled. To fully end the service and avoid further charges, you need to cancel your subscription manually.
5. How to Remove Devices from Your Apple Music Account on iPhone
In fact, an Apple Music account can be connected to up to 10 devices. Once a device is removed, it will no longer have access to your music library or offline downloads. This helps you better manage your Apple Music account and ensures that only trusted devices can access it. Below, we will go over two common ways to remove devices from Apple Music on iPhone:
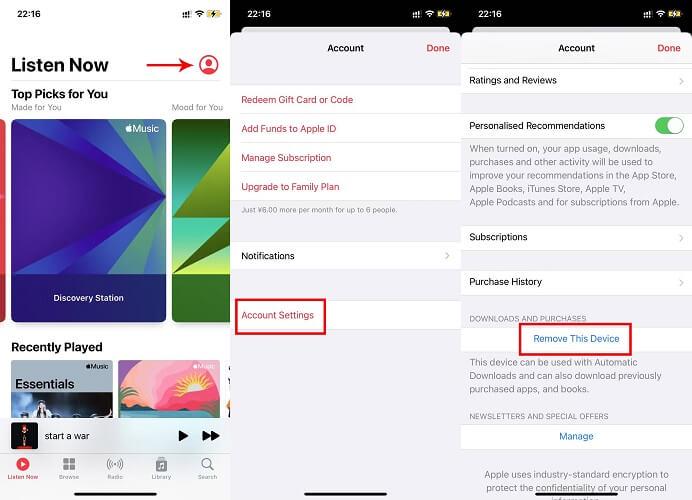
On the Apple Music App:
If you want to temporarily disconnect the iPhone you are currently using, you can do so directly within the Apple Music account settings. This will not completely remove the device from your account (it will still be associated upon the next login), but it will suspend that device's access to Apple Music. Here are the steps:
Step 1. Open the Apple Music app on your iPhone.
Step 2. Tap on your profile picture at the top right.
Step 3. Select "Account Settings". Then, you will need to enter the passcode or verify your Face ID.
Step 4. Scroll down to choose the "Remove This Device" option to remove your iPhone from Apple Music without a computer.
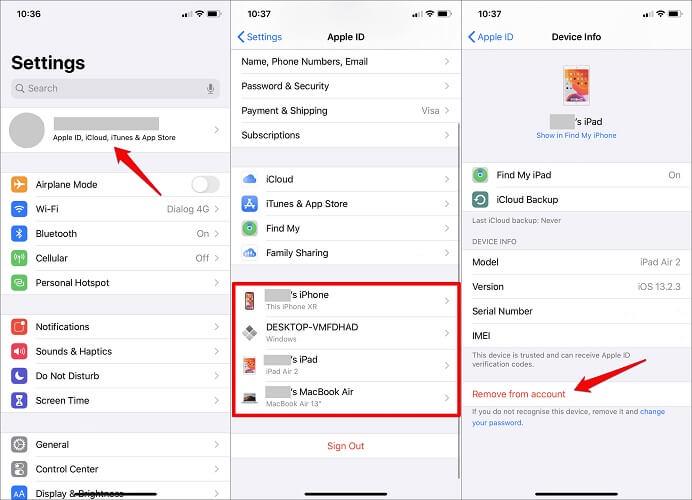
On iPhone Settings:
For devices that you don't use frequently or that you no longer use but are still listed, you can remove them through your iPhone settings. Please note that this method is unable to remove the iPhone you are currently using. Here is how you do it:
Step 1. Navigate to "Settings" on your iPhone.
Step 2. Tap on your Apple ID at the top.
Step 3. Find the full list of your authorized devices on the screen.
Step 4. Choose the one you want to deauthorize, and then tap on "Remove from Account".
Bonus Tip: How to Keep Apple Music Forever Before Removing from iPhone
Just a heads up: once your Apple Music subscription expires, all your treasured and often-played downloaded tracks will be invalid as well due to DRM protection. So, is there a solution to remove Apple Music from iPhone but keep your favorites? The answer is yes!
TuneFab Apple Music Converter is your solid partner! It is a powerful tool that is especially designed to download songs, albums, and playlists from Apple Music on Windows and Mac. The best part is that this downloader can convert Apple Music to MP3, M4A, FLAC, WAV, AIFF, etc, while removing DRM protection. This way, you can effortlessly transfer downloads to your iPhone and other devices for offline listening, without any restrictions!
More Highlights of TuneFab Apple Music Converter:
- Download Apple Music songs, albums, and playlists as DRM-free files for permanent playback.
- Preserve the original audio quality to ensure an excellent listening experience.
- Retain all original ID3 tags and metadata info for handy management.
- 35X faster speed to batch download Apple Music songs with one click.
- Unlock all Apple Music download restrictions to let you enjoy music on any device and player.
Such an advanced and powerful tool only requires a few simple clicks to get Apple Music songs downloaded. With its built-in web player, even if you are a total novice, you can easily get started. Let's move on to learn more!
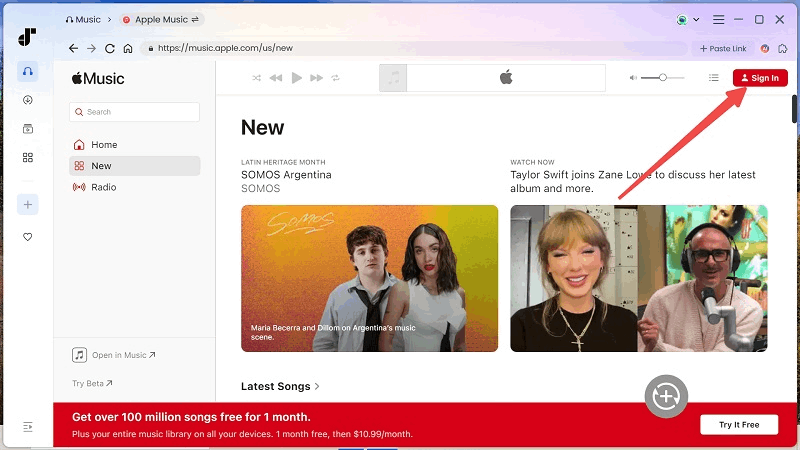
Step 1. Launch TuneFab Apple Music Converter on your computer. Then, choose the Apple Music service entrance. To access the entire music library, you will need to sign in to your Apple Music account to move on.
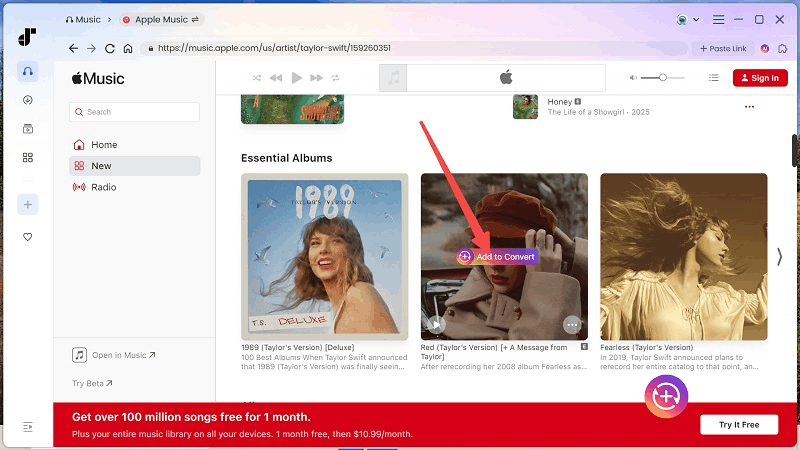
Step 2. Locate your favorite song. Then, drag and drop it to the floating red "+" icon on the right to add it to the conversion list. Or you can click on the "Add to the conversion list" button on the cover to do so.
Step 3. In the conversion list, you can click the dropdown menu of output format and audio quality to customize your preferred output settings.

Step 4. Click "Convert All". Then TuneFab will download Apple Music songs at a lightning speed. After that, go to "Finished" and click the folder icon to find your downloads. Now, you can transfer Apple Music songs to your iPhone for offline listening permanently!
Conclusion
This article covers everything you want to know! By reading it, you can easily learn how to remove Apple Music from iPhone. Also, if you would like to back up your favorite songs from Apple Music beforehand, TuneFab Apple Music Converter can be your ideal solution.
Download it now and ensure your music collection will not be lost when you remove Apple Music from your iPhone.
