


For music enthusiasts, they may not be satisfied with just listening to music on your phone or PC, they would like to play music through speaker for better audio experience. If you are looking for a speaker that adapts to its location and delivers high-fidelity audio wherever it's playing, then you can't miss HomePod which is a breakthrough speaker developed by Apple Inc. Together with Apple Music and Siri, HomePod creates a brand new way for you to enjoy music at home. What's more, it can also help you with everyday tasks and control your smart home, what you need to do is to say the word. But as the HomePod is linked to your Apple Music account, sometimes you may need to change Apple Music account on Home Pod. Then how to change? Don't worry, it's very easy to change Apple Music account on HomePod, just follow me and I would like show you the easiest solution.
Don't Miss: How to Convert Apple Music to MP3
Part 1. How to Set Up Your New HomePod
In case that you just buy your new HomePod and prepare to set it up for the first time, hence before showing how to change the Apple Music account on HomePod, let's figure out how to set up your new HomePod first.
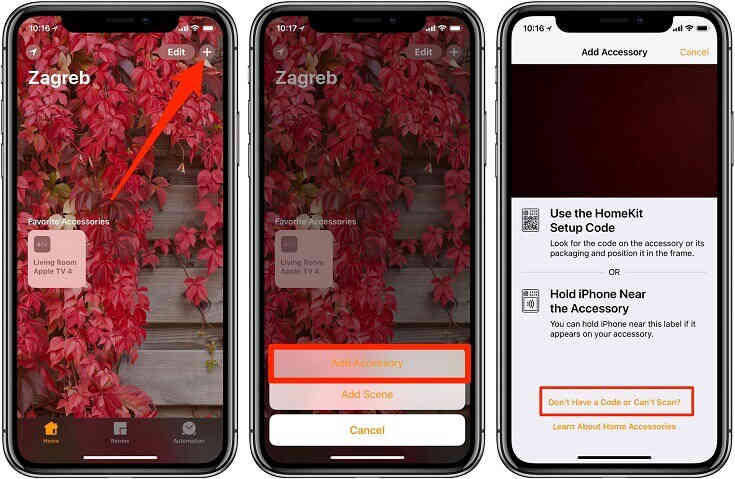
Step 1. First check whether you have installed both the Home app and the Music app on your iOS device, if not just get them from Apple Store. After that, open the Home app on your iOS device.
Step 2. Then click on "+" button in the top right corner of the screen and choose the "Add Accessory" option from the pop-up menu at the bottom.
Step 3. Next click on the link "Don't Have a Code or Can't Scan?" at the bottom.
Step 4. At last, find your HomePod from the "Nearby Accessories" list and choose it.
Now you have finished setting up your new HomePod, you can start to enjoy playing Apple Music on your new HomePod.
Part 2. How to Change Apple Music Account on HomePod
Once you set up your new HomePod for the fist time, your information from iOS device such as saved Wi-Fi passwords and your Apple Music subscription will be transferred to HomePod automatically. If you want to link another Apple Music account to your HomePod for playing others' playlists, then you need to follow the below ultimate guide.
Step 1. Launch the Home app on your iPhone, iPad, iPod touch or other iOS devices.
Step 2. Touch and hold your "HomePod" icon in the Home.
Step 3. Then you can see two options at the bottom, Alarms or Details. Just click on "Details" icon to enter the HomePod settings interface.
Step 4. Find and click on "Account" icon.
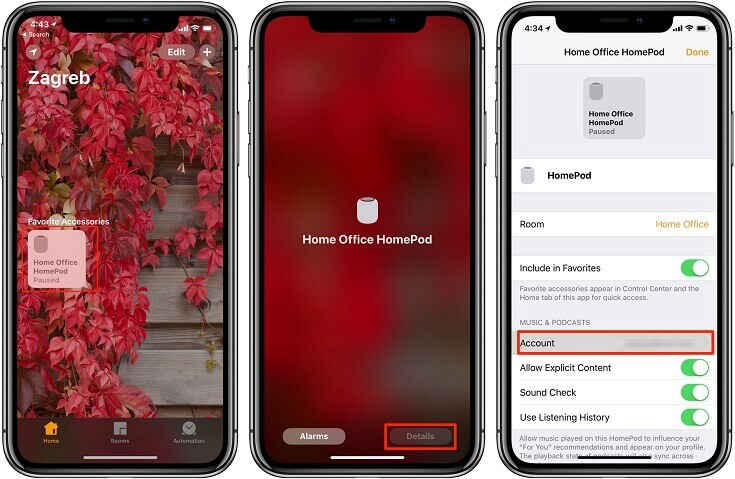
Step 5. After that, you will see an interface as below, the current Apple ID which connected to HomePod is shown on it. Just click on "Sign Out" icon to quit the current Apple account.
Step 6. Then click on the link "Sign In Using a Different Apple ID", you will see an instruction that requires you to enter another Apple Music account.
Step 7. Finally, just enter the user name and password of the Apple Music Account that you plan to use on HomePod. After entering, click on "Sing In" icon.
Attention: don't forget to go back to the previous screen and click on "Done" icon to save the changes. Now it's your time to enjoy music from the Apple Music account that you changed on Home Pod.

Part 3. Tips for Controlling Your New HomePod
HomePod is such an amazing and powerful speaker, some of you may not totally know how to control it well, hence here comes with some tips for controlling your new HomePod.
#1. Touch Controls
HomePod has a giant touch panel on the top, you can control the volume and playback by tapping the panel. For example, single tap represents "Pause or Play", double tap means "Skip Forward", triple tap is for "Skip Back", while long pressing can activate Siri.
#2. Control From iTunes
Except control HomePod by using the touch panel of it, you can also control from iTunes, but make sure you have downloaded the latest version of iTunes. In iTunes, click on the AirPlay icon and then you will see your HomePod toward the bottom of list. With HomePod selected, you can use playback toggles to control HomePod including playing or pausing the music, turning up or down the volume and skip back or forward.
#3. Control From iOS Devices
Of course you can control HomePod by your iOS devices but don't forget install Home app and Music app on your iOS devices first. In the Music app, just bring up the Now Playing interface and click on the "AirPlay" icon to select the "HomePod" icon. Then click on the background to go back to the Music app. Now you can control the HomePod on iOS devices.
Enjoying Apple Music on HomePod sounds wonderful, doesn't it? If you want to change the Apple Music account on HomePod, then just follow the ultimate guide mentioned above, but if you want to play Apple Music on multiple devices, then you need to download a professional Apple Music Removal tool like TuneFab Apple Music Converter which is designed for converting Apple Music to MP3, AC3, M4A, M4R, FLAC and more.