

Since first launched in 2012, OBS or Open Broadcaster Software has become the staple of many when it comes to live streaming. Whether you are a YouTuber, digital marketer, or hosting a live online meeting, you can use this open-source program to record and stream audio & video to the majority of streaming platforms for free. If you wish to enrich your videos and engage your audiences, you won't want to miss Spotify's sizable music collections. That's why one of the essential skills to master is to add Spotify to OBS when setting up your stream.
How to add Spotify to OBS? This article offers a comprehensive guide on two efficient ways to add Spotify to OBS. Hopefully, it can help you streamline your workflow and create more engaging videos.
- Method 1. Add Spotify to OBS Using Window Capture (Official Way)
- Method 2. Add Spotify to OBS as Audio Source (Best High-Quality Solution)
- OBS Audio Setup Tips for Spotify Streamings
- OBS vs Streamlabs OBS: Which Is Better for Spotify Streaming?
- Alternative Ways to Show Spotify Music on Stream
- FAQs About Adding Spotify to OBS
- Conclusion
Method 1. Add Spotify to OBS Using Window Capture (Official Way)
With OBS Studio and Streamlabs OBS, you can use the "Window Capture" feature, an official solution to adding and displaying Spotify songs on OBS. If you are going to play Spotify during live streaming, due to DRM protection, you should make sure you use copyright-free Spotify music. Otherwise, you will be muted or the livestream video will be removed. Follow the steps to kick off.
Note:
1. What You Need Before Starting:
- OBS Studio / Streamlabs OBS installed
- Spotify desktop app ready
2. If you are using the free version of Spotify, ads might pop up while playing Spotify. To get rid of the hassle, click here to check out the workaround.
Step 1. Install and launch both Spotify and OBS on your computer.
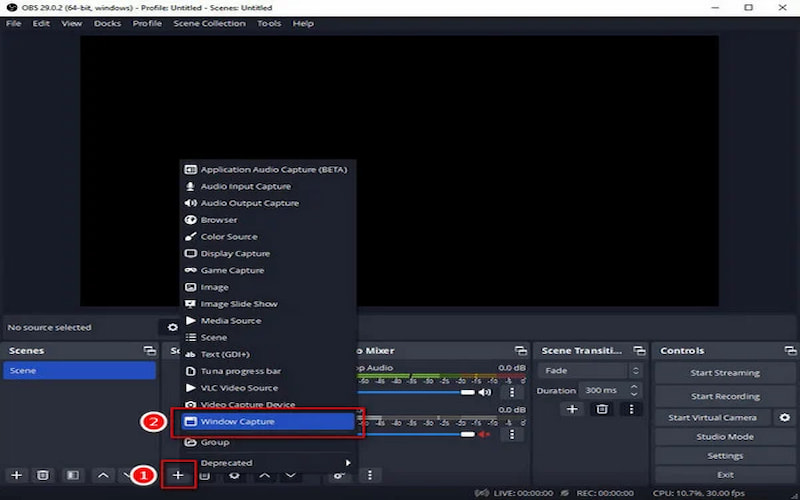
Step 2. Go to the "Sources" window, click the plus icon, and select "Window Capture".
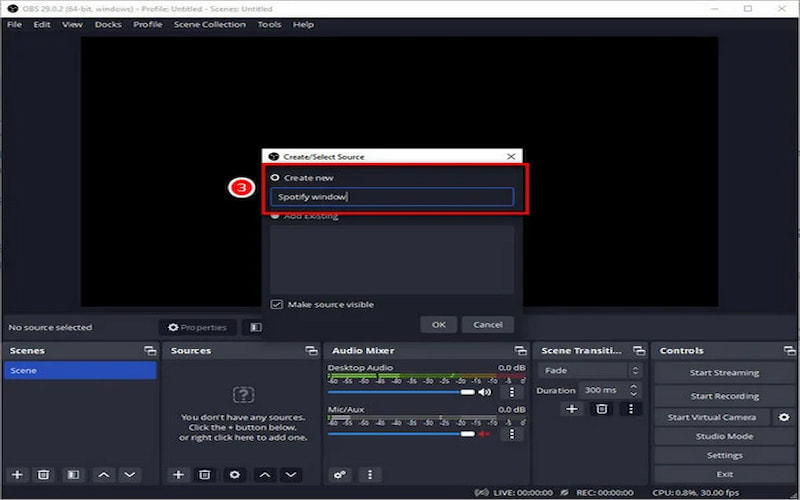
Step 3. Select "Create new" in the pop-up, enter a name for the new source, and then hit "OK".
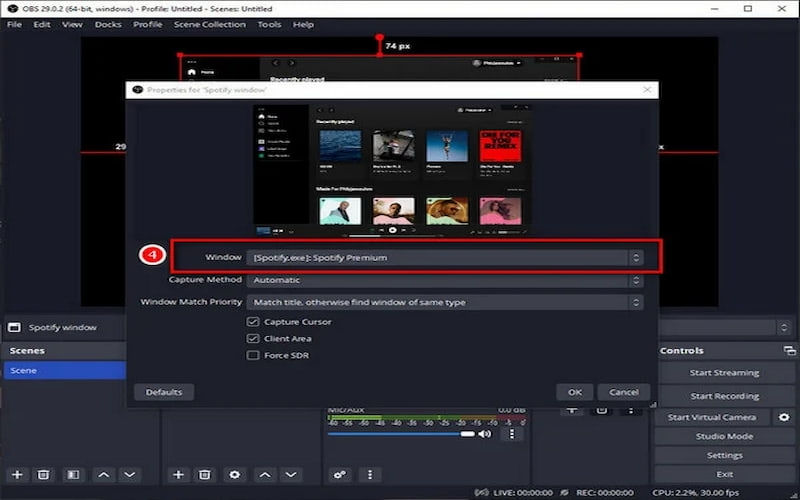
Step 4. In the "Properties" pop-up, select "[Spotify.exe]: Spotify Free" or "[Spotify.exe]: Spotify Premium" from the "Window" drop-down menu. Hit "OK" to add Spotify music to OBS.
Step 5. Crop, resize, or move the Spotify display window on your screen to create a clean overlay.
Now, you have successfully added Spotify to Streamlabs OBS! Just hit the play button in Spotify and the music will come through the Audio Mixer, where you can adjust the volume settings.
Pros and Cons
✅ Pros
- Easy to set up with OBS built-in feature
- No extra tools required
- Displays Spotify playback in real time
- Works on both OBS Studio and Streamlabs
❌ Cons
- May fail to capture Spotify audio properly
- Ads will interrupt playback (Spotify Free)
- Requires Spotify to run in the background
- Limited control over music in OBS
- Risk of copyright issues during streaming
Method 2. Add Spotify to OBS as Audio Source (Best High-Quality Solution)
Although adding Spotify to OBS via Window Capture is simple, you might encounter problems such as OBS not picking up Spotify. For free users, you may also find that ads appear while playing royalty-free Spotify tracks. In such cases, how to add Spotify to OBS? An ultimate solution is to download Spotify playlists to MP3 with professional Spotify music converters and add the songs to OBS Audio Source.
TuneFab Spotify Music Converter, an outstanding third-party tool, allows both premium users and free users to download Spotify music. Better still, it can remove DRM from Spotify music, allowing you to listen to Spotify songs offline and play Spotify songs with various non-Spotify media players, such as OBS.
Once converted, you can easily add Spotify tracks to OBS, loop them, control volume precisely in the Audio Mixer, and avoid any unexpected interruptions during your stream. If you have a large music library, TuneFab supports batch conversion at up to 35X faster speed while preserving original sound quality. This makes it an efficient solution for streamers who want to build a reliable local music library for OBS.
Key Features of TuneFab Spotify Music Converter
- Convert Spotify music to local files for OBS Media Source playback
- Support popular audio formats including MP3, M4A, WAV, FLAC, AAC, AIFF, and ALAC
- Boost productivity with a 35X faster download speed
- Output high-quality audio up to 320kbps for streaming
- Remove DRM protection to enable playback outside Spotify
- Preserve basic ID3 tags for easy organization in OBS and local libraries
With an intuitive and clean interface, TuneFab Spotify Music Converter offers a more user-friendly solution than using Window Capture. Compatible with both Windows and macOS, this program is available to download for free and allows you to experience its functions on a free trial. Here's how to add Spotify on OBS with this tool.
Step 1. Launch TuneFab on your Computer and Log in
Download the download package compatible with your computer's operating system from the official website for free. After installing and launching the program, log in with your Spotify account.
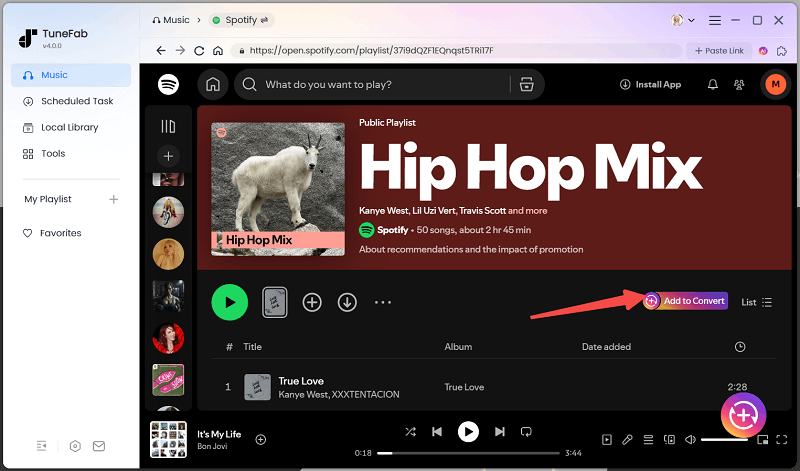
Step 2. Add the Songs to be Streamed on OBS to the Converting List
Search for the title of the music you wish to stream on OBS. Hit the "Add to Convert" button over the music cover art to add the song to convert.
Step 3. Choose MP3 as Output Format
Before removing DRM and downloading the songs, you can choose "MP3" as the output format for your songs at the right corner.

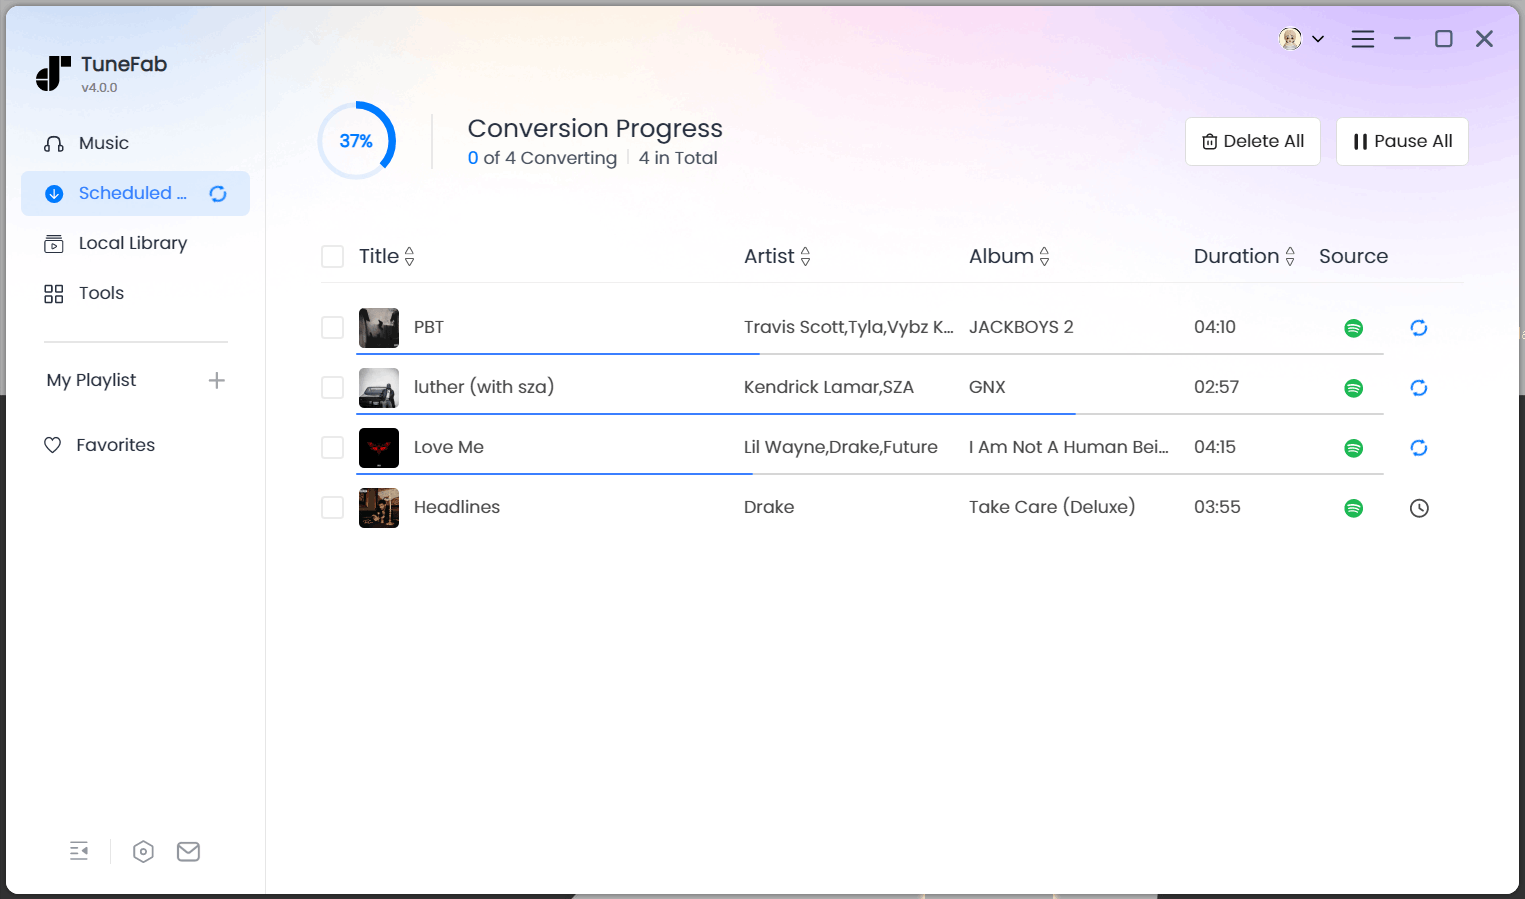
Step 4. Convert Spotify Music to MP3 with a Click
Click "Convert Now" to initiate converting. The songs will be downloaded in batches to the reset folder. Now, you can play Spotify music offline and import the songs to OBS Audio Source. Keep reading for detailed steps.
Step 5. Select Media Source
Install and launch OBS Studio on your computer. Click "Media Source" under the "Sources" window.

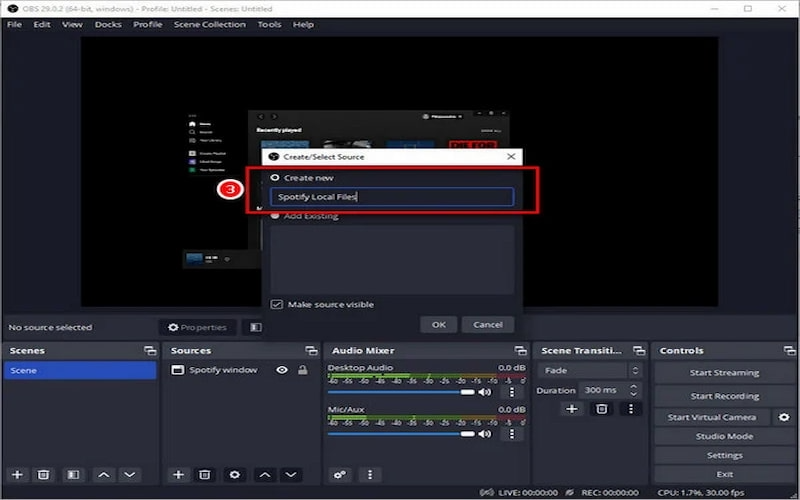
Step 6. Create a New Source
Select "Create New" in the pop-up and enter a source name, for example, "Spotify Local Files". Click "OK".
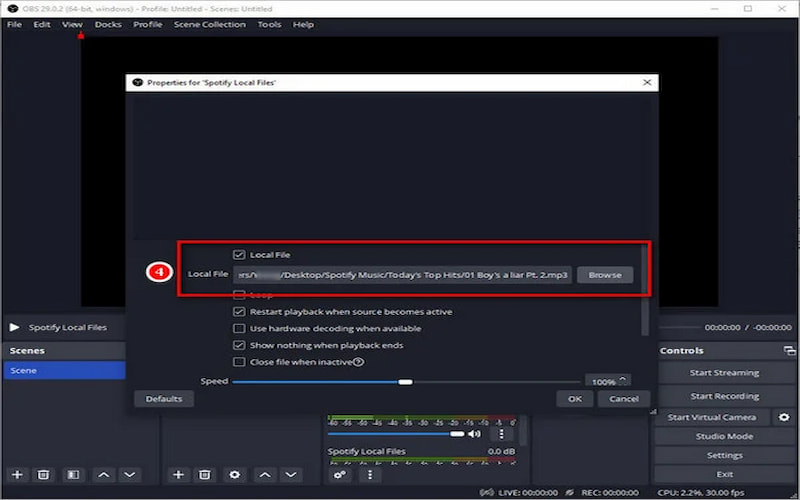
Step 7. Add Spotify Local Files to OBS
Browse and select the downloaded songs in the "Local File" box. Select "Loop" if you wish the music to play in a loop. Then click "OK". A new media source named Spotify Local Files will be displayed in the "Sources" window.
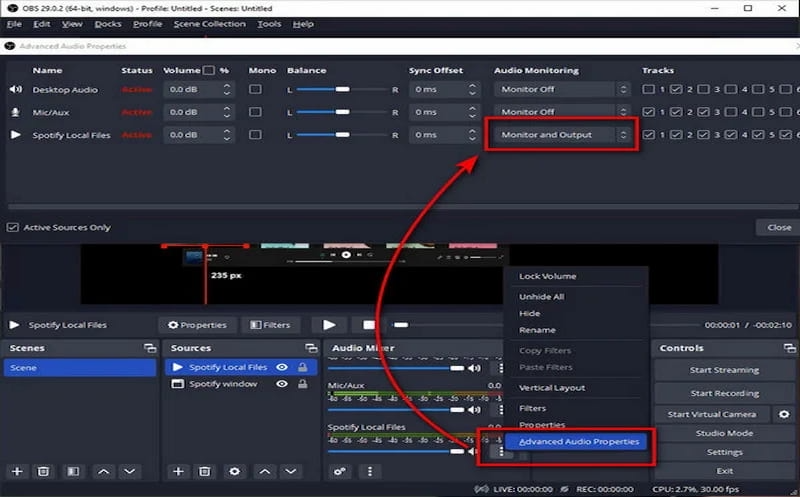
Step 8. Set the Monitor and Output mode
Click the three-dot icon next to Spotify Local Files. From there, you can enable the "Monitor and Output" option from the "Advanced Audio Properties" window. Now, the Spotify song will automatically be played through Audio Mixer when your stream comes to the scene!
Pros and Cons
✅ Pros
- No ads or interruptions during streaming
- Stable playback without OBS capture issues
- Full control over music (loop, timing, volume)
- Works offline without running Spotify
- Better audio quality for professional streams
❌ Cons
- Requires extra tool (Spotify converter)
- Setup takes more time than Window Capture
- Needs local storage for downloaded music
- Not real-time synced with Spotify app
OBS Audio Setup Tips for Spotify Streaming
Once you’ve successfully added Spotify to OBS, whether through Window Capture or as a Media Source—the next step is making sure your audio is properly configured. A clean audio setup not only improves sound quality but also helps you avoid common streaming issues like volume imbalance, echo, or missing audio.
Below are some essential OBS audio settings tips to optimize your Spotify streaming experience:
| Section | What to Do | Pro Tip |
| Add Spotify to Audio Mixer Properly | Make sure Spotify appears correctly in OBS Audio Mixer (via Desktop Audio or Media Source) | Rename the source as “Spotify Music” for easier management during live streams |
| Adjust Volume Balance (Game / Mic / Music) | Balance all audio sources so music doesn’t overpower your voice or game sound | Keep background music slightly lower than voice (around 10–30% lower) for better clarity |
| Avoid Echo or Duplicate Audio Issues | Disable duplicate audio inputs and unnecessary monitoring settings | Use headphones instead of speakers to prevent audio feedback and echo |
OBS vs Streamlabs OBS: Which Is Better for Spotify Streaming?
Both OBS Studio and Streamlabs OBS can be used for Spotify streaming, but they differ in flexibility, performance, and ease of use. Below is a clear comparison to help you choose the right tool for your setup.
| Feature | OBS Studio | Streamlabs OBS |
| Ease of Use | ❌ Steeper learning curve | ✅ Beginner-friendly interface |
| Performance | ✅ Lightweight, low CPU usage | ❌ Heavier on system resources |
| Audio Control (Spotify) | ✅ Advanced control over audio sources | ⚠️ Basic audio routing options |
| Customization | ✅ Highly flexible with plugins and settings | ⚠️ Limited compared to OBS Studio |
| Built-in Features | ❌ Requires manual setup | ✅ Built-in overlays, alerts, widgets |
| Stability for Streaming Spotify | ✅ More stable and precise | ⚠️ May lag on lower-end devices |
| Ideal For | Professional / advanced streamers | Beginners / casual streamers |
Which One Works Better with Spotify?
For Spotify streaming specifically, OBS Studio is generally the better option because it offers more precise audio control and better system stability, especially when managing multiple audio sources like music, game sound, and microphone input.
On the other hand, Streamlabs OBS is more suitable for beginners who want a quick setup and prefer built-in tools without dealing with complex audio configurations.
In short:
- OBS Studio → Best for control, stability, and professional Spotify streaming
- Streamlabs OBS → Best for simplicity and fast setup
Alternative Ways to Show Spotify Music on Stream (Optional Enhancements)
Besides adding Spotify audio to OBS, many streamers also want to visually display the current song on screen. This helps viewers know what’s playing and improves engagement during live streams. If you don’t want to rely only on Window Capture, there are several lightweight overlay-based solutions you can use.
Use Browser Widgets for “Now Playing” Display
One of the easiest ways to show Spotify music on OBS is by using a browser-based “Now Playing” widget. These widgets generate a URL that you can add directly into OBS as a Browser Source.
To set it up:
- Log in to a Spotify-compatible widget service
- Copy the generated widget URL
- In OBS, add a Browser Source and paste the link
- Resize and position the overlay on your stream layout
Use Overlay Tools for Song Information
Some streaming tools and chatbot platforms also offer music overlay features that integrate directly with OBS. These tools can display:
- Song title
- Artist name
- Album artwork
- Progress bar (in some cases)
They are often more customizable than basic widgets and allow you to match your stream’s visual style.
Third-Party Spotify Stream Widgets (e.g., Now Playing Overlay Tools)
There are also dedicated third-party “Now Playing” tools designed specifically for streamers. These tools typically offer:
- Real-time Spotify track updates
- Customizable visual themes
- Compatibility with OBS, Streamlabs OBS, and other streaming software
- Easy URL-based integration (no complex setup required)
They are a great option if you want a more polished and professional-looking music display without manually configuring OBS sources.
FAQs About Adding Spotify to OBS
Can I Play Spotify on OBS Without Premium?
Yes, you can use Spotify on OBS even without a Premium account. The most common method is Window Capture, which works with both Spotify Free and Premium users. However, Spotify Free includes ads and playback interruptions, which may affect your stream quality.
If you want a more stable experience, many streamers choose to use downloaded local audio files added to OBS as a Media Source instead.
Why Is OBS Not Capturing Spotify Audio?
This is a fairly common issue and usually happens for one of the following reasons:
- Wrong audio source selected (e.g., Desktop Audio is disabled in OBS)
- Spotify is routed to a different output device than OBS is monitoring
- Windows/macOS audio settings conflict with OBS capture settings
- App update or permission issue causing capture failure
To fix it, check your OBS Audio Mixer settings first, and make sure Spotify is playing through the same system output that OBS is capturing.
Is It Legal to Stream Spotify Music on Twitch with OBS?
It depends on the type of music you are streaming and the platform rules. Spotify music is protected by copyright and DRM, and most tracks are not licensed for public broadcasting on platforms like Twitch or YouTube.
If you stream copyrighted Spotify songs, you may face:
- Muted audio segments
- Stream takedowns or VOD blocks
- Copyright strikes on your channel
To stay safe, streamers often use:
- Royalty-free Spotify playlists (when properly licensed)
- Own licensed music libraries
- Downloaded local tracks for personal use in OBS
Always make sure the music you use is cleared for streaming on your chosen platform.
You may like:
Conclusion
There are two effective ways to add Spotify to OBS, depending on how you want to set up your stream.
The Window Capture method is quick and beginner-friendly, allowing you to display Spotify directly in OBS with minimal setup. However, it may come with limitations such as ads, unstable audio capture, and limited playback control.
The Media Source method using local audio files offers a more stable and professional solution. By converting Spotify music with a Spotify music converter, you can import tracks directly into OBS, avoid interruptions, and gain full control over playback and audio quality.
In short, Window Capture works well for simple setups, while local audio files provide a better long-term streaming experience for more serious creators.
