

YouTube Music is a paradise for music lovers to explore millions of songs in all genres. For some music enthusiasts, simply streaming isn't enough—they may want to download songs and burn a CD from YouTube Music to keep their favorite songs/albums forever. That's actually a piece of cake if you get the rope here.
This post will give you a detailed guide on how to download music from YouTube to MP3/WAV/FLAC and then burn YouTube Music to CD on Windows/Mac. Now, let's get started right away.
- Part 1. How to Download Music from YouTube for Burning
- Part 2: How to Burn YouTube Music to CD on Windows 10/11/8/7
- Part 3. How to Burn a CD from YouTube on MacBook Air/Pro/iMac
- Part 4. How to Choose the Right CD Type for Better Compatibility
- Part 5. Troubleshooting Tips for Burning YouTube Music to CD
- Part 6. FAQs About Burning YouTube Music to CD
- Conclusion
Part 1. How to Download Music from YouTube for Burning
First off, you need to download songs from YouTube Music as MP3 files onto your computer. However, due to DRM protection, the downloaded YouTube Music files can not be played outside the official app. Let alone burn YouTube Music to a CD for playing. Fortunately, this limitation can be easily overcome with a third-party tool like TuneFab YouTube Music Converter.
This powerful converter lets you download songs from YouTube Music to digital formats like MP3/M4A/WAV/FLAC/AIFF with original quality. You can download the whole catalog of YouTube Music, including single songs, albums, playlists, mixes, live performances, and podcasts as long as you have enough storage.
Once downloaded, you can burn your favorite tracks onto CDs to create your own exclusive collections. Better yet, you'll be able to enjoy melody on any device like iPods, Speakers, Car Audio, Smart TVs, Gaming Consoles, etc.
Explore More Marvelous Features
- 35X Ultra-Fast Speed Based on a stable and smooth internet or Wi-Fi connection, this dedicated software can accelerate the conversion process up to 35X faster than ever.
- Batch Download Tasks This program can tackle multiple downloads at once and it only takes a button to download a single song or the entire album/playlist to local storage with ease.
- Lossless CD Quality TuneFab YouTube Music Converter offers 3 options for you to grab songs of original quality from YouTube Music equivalent to 3 tiers of audio quality, Low, Normal, and High.
- No Premium/Login Required The silver lining is that you don't need to be a YouTube Music Premium subscriber or even log in to your account in order to take advantage of this excellent software.
- DRM-Free and Ad-Free Listening TuneFab YouTube Music Converter will remove DRM protections and ads from the downloads so you can enjoy flexible and seamless playback offline.
- ID3 Tags and Metadata Preservation This expert will keep all the titles, artists, Track IDs, and album artwork of the entire albums for you to easily manage the downloads on a CD.
With its default YouTube Music web player, it cannot be easier to download songs from YouTube Music in 3 steps. Now, let's see how it works.
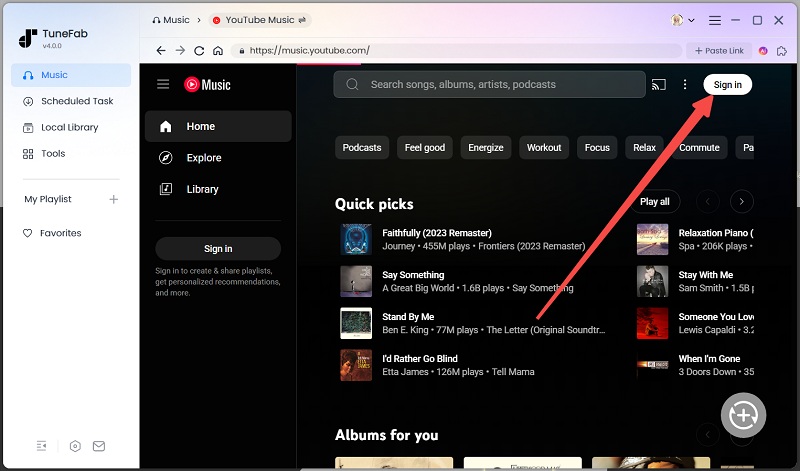
STEP 1. Download and Install the Software
Give it a click on the button above and install TuneFab YouTube Music Converter on your Windows/Mac. It's well-compatible with Windows 7/8/8.1/10/11 and mac OS X 10.12 or above. Then, launch the software and access the YouTube Music web player. It doesn't matter whether you sign in to your account or not.
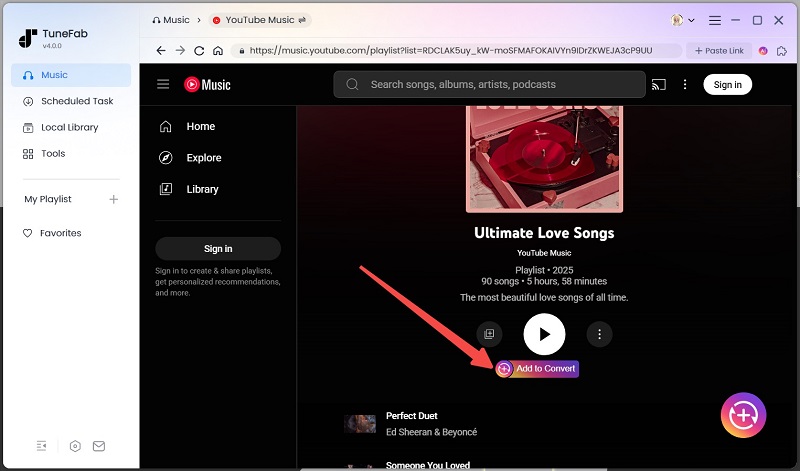
STEP 2. Navigate to Music You Want to Burn
Now, search for the songs/albums/playlists that you want to burn songs from YouTube. Simply drag the cover to the conversion list on the right or click the "Add to the conversion list" button over the album/playlist page.
STEP 3. Adjust Output Parameters
Before downloading music from YouTube to a CD, you may want to expand the conversion list and adjust the output format and audio quality.
Note: To burn YouTube Music tracks to CD, it is advisable to download them as MP3 files in 320kbps, as MP3 is compatible with most CD players and takes up relatively little storage space.
If you prefer lossless sound quality, WAV is a better option, though keep in mind that the file sizes will be much larger. Also, make sure your CD-burning software and playback devices support this format to avoid compatibility issues.
Read Also: 5 Best YouTube to WAV Converters that Really Works in 2025

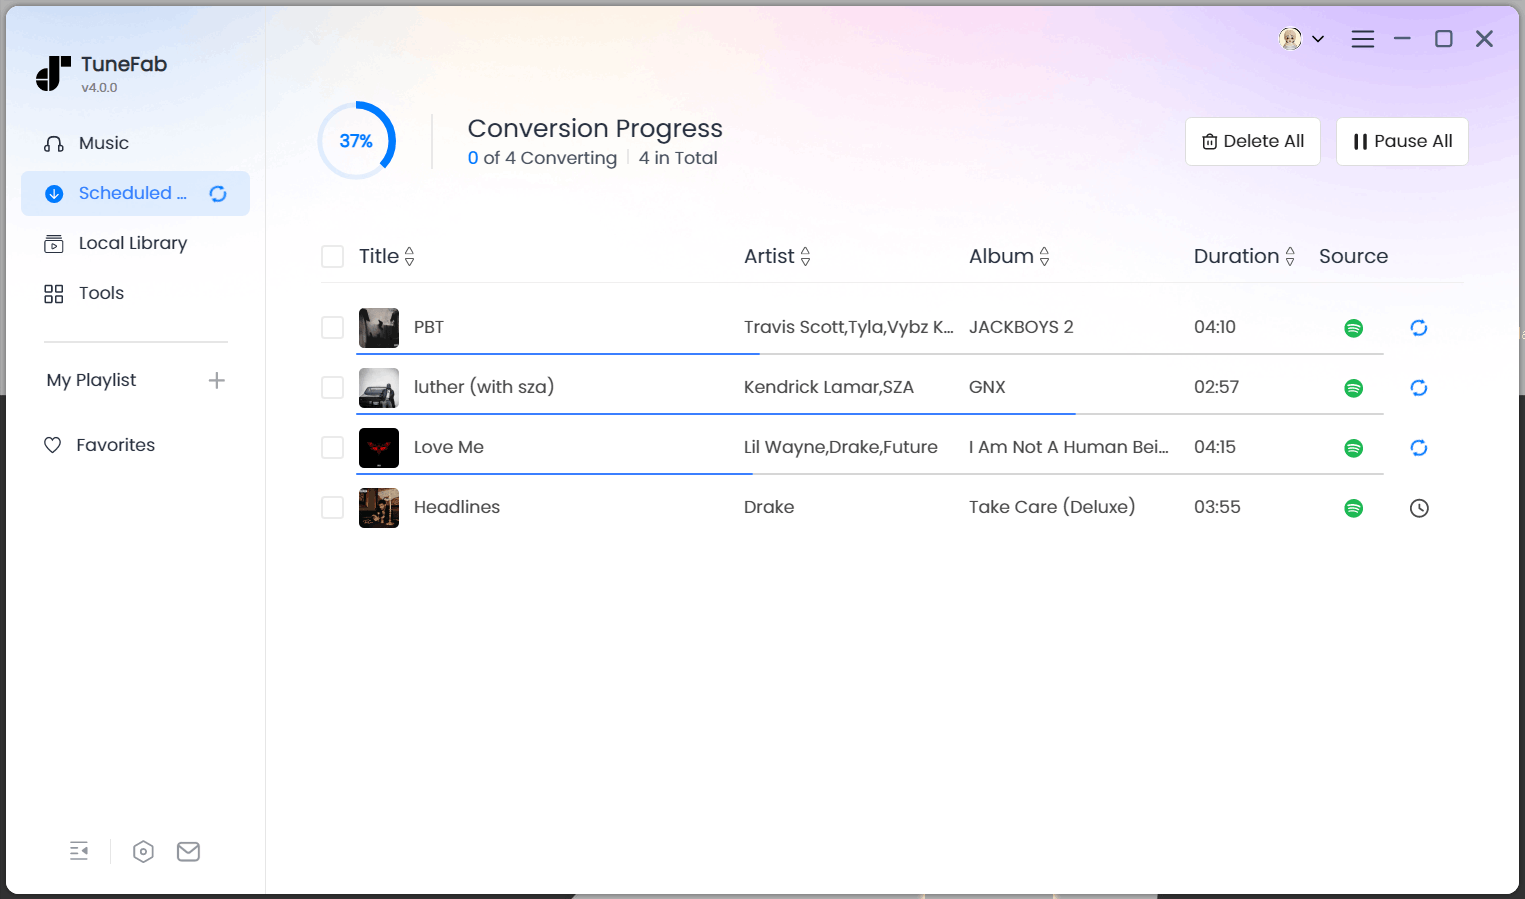
STEP 4. Download YouTube Music to MP3
After that, the software will start fetching data and show the songs on the screen. You should make your selection and hit the 'Convert All' button to download music from YouTube. Once finished, go to 'Finished' to access the downloaded YouTube Music songs. Then you are ready to burn YouTube Music to CD.
Part 2. How to Burn YouTube Music to CD on Windows 10/11/8/7
After you download YouTube Music to MP3, it's time to burn songs from YouTube Music to CD. If you're using a Windows PC, you don't need third-party software at all. The pre-installed Windows Media Player will do a perfect job for you. Apart from the burning software, make sure you have the following things prepared.
- A CD recorder drive
- A blank CD: Typically, there are 2 types of CD. Audio CDs are crafted for music only, having only up to 80-minute capacity. If you have a large number of YouTube Music songs to burn, opt for Data CDs, which can contain roughly 8 hours of music.
- Downloaded YouTube Music tracks
Once you've got everything prepared, let's see how to burn music from YouTube to CD.
STEP 1. Insert a blank CD into your Windows computer.
STEP 2. Search 'Windows Media Player' in the Windows Menu and click it to open the program.
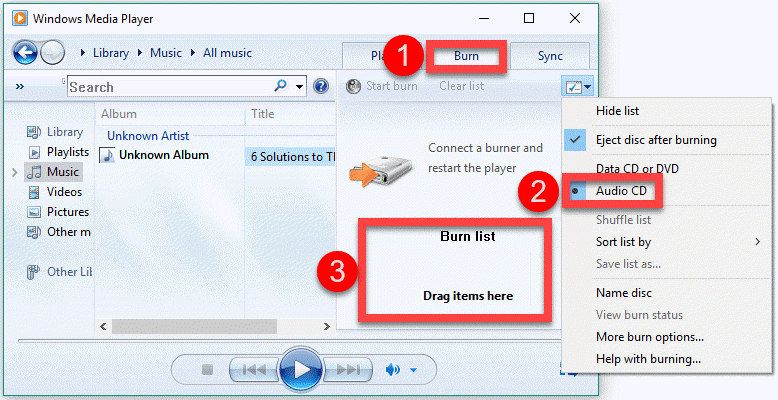
STEP 3. Switch to the 'Burn' tab and click the 'Drop-down Menu' for more options. Then, choose 'Audio CD' to proceed.
STEP 4. Open the folder of downloads from YouTube Music and directly drag songs to somewhere below 'Burn List'. When you've added all your desired YouTube Music, click 'Start burn' to burn YouTube Music to CD. The whole process may take a while to complete.
Part 3. How to Burn a CD from YouTube on MacBook Air/Pro/iMac?
You can use the Music app to burn YouTube Music to a CD if you're using a MacBook Air/MacBook Pro/iMac/Mac mini. You also need to get the following items ready before getting started.
- A CD burner
- A blank CD: You can create 3 types of discs. Audio CDs can only hold about 80 minutes of audio, but are compatible with most CD players. Though data CDs can store 8-hour music, you have to ensure your CD player supports the file types you add to the disc. In contrast, MP3 CDs have the largest capability, but they only support MP3 files.
- Converted YouTube Music songs
Then, follow the instructions below to burn songs from YouTube Music to a CD on Mac with ease.
STEP 1. Launch the Music app on your Mac and insert your blank CD disc into the drive.
STEP 2. You need to put all songs in the same playlist first, so please go to 'File' > 'New' > 'Playlist'. Then, give it a name and select songs you downloaded from YouTube Music to 'Add to Playlist'.
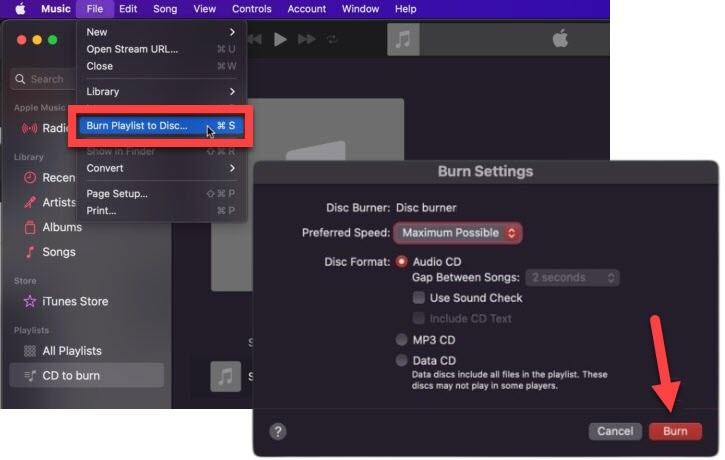
STEP 3. Now, click 'File' followed by the 'Burn Playlist to Disc' option and bring up the 'Burn Settings' window.
STEP 4. Click the 'Burn' button to start burning YouTube Music to CD.
Part 4. How to Choose the Right CD Type for Better Compatibility
When burning YouTube Music to a CD, the first step is to determine which type of CD you want to create. This is crucial because choosing the wrong type may result in playback issues or audio quality that doesn't meet your expectations. Generally, CD types can be categorized as follows:
- CD-R (Recordable): As the name suggests, this disc can only be burned once. Once written, the content is converted to CD-ROM format and cannot be modified or deleted. CD-Rs offer high compatibility and are ideal for permanent music storage.
- CD-RW (Rewritable): This type of disc can be erased and re-recorded multiple times. However, some older CD players may not recognize them.
Besides the type of CD, the burning format also affects compatibility. Generally, there are two common burning formats:
- Audio CD: This is the traditional music disc format. Audio files such as MP3 or WAV are processed by a computer into CD audio tracks and then written onto the disc. Audio CDs have strong compatibility and can be played on almost all CD players, car stereos, and DVD players.
- Data CD: Works like a USB drive for storing files. You can directly store MP3, WAV, or other audio files, but they can only be played on devices that support those formats.
Part 5. Troubleshooting Tips for Burning YouTube Music to CD
Why won't my burned CD play?
A burned CD may fail to play for several reasons. Incompatibility between the CD type and the playback device is one of the most common. As we discussed in the previous section, some older CD players may not recognize CD-RW discs.
Another potential issue arises if you choose the Data CD option when using burning software, as certain players are unable to read the specific audio file format. Physical factors can also play a role—scratches or stains on the disc surface, as well as interruptions or errors during the burning process, may all lead to playback failure.
Why does the burned CD have poor audio quality or background noise?
If the burned CD has poor audio quality or noticeable background noise, it may be because the source file itself was not in a lossless format. When downloading audio files, it's best to choose high-quality formats such as MP3 at 320kbps, or lossless formats like WAV or FLAC.
Another possible reason is that the file was converted using a lossy codec during the process of downloading YouTube Music to your computer, which results in compression and reduced sound quality. Therefore, when selecting a converter, try to choose one that supports lossless conversion.
Low-quality blank discs or unstable burning hardware can also affect the final result. To minimize errors, use high-quality CDs and lower the burning speed (e.g., 4x or 8x) for better accuracy.
What should I do if there are too many files to fit on the CD?
A standard CD-R typically holds 700MB of data or about 80 minutes of audio. If the number of files you want to burn exceeds this capacity, you can start by trimming down your track list.Use the 80-minute limit as a guide and prioritize the songs you most want to include.
If you can't decide, consider splitting the content across multiple CDs. Alternatively, you can compress the audio files to smaller sizes, though this may come at the cost of reduced sound quality.
How can I improve the sound quality when burning YouTube Music to a CD?
To improve the overall sound quality when burning YouTube Music to a CD, start with high-quality source files. Use lossless Spotify conversion tools like TuneFab YouTube Music Converter to download audio in high bitrate or lossless formats such as 320kbps MP3, FLAC, or WAV to avoid compression during conversion.
When burning, choose high-quality blank CDs and reduce the burning speed to ensure better results. Also, avoid running your computer under heavy load during the burning process to minimize potential interference or errors, helping you achieve a cleaner and more refined sound.
Part 6. FAQs About Burning YouTube Music to CD
Is It Illegal to Burn CDs from YouTube Music?
It is a common question when it comes to burning YouTube Music to CD. Actually, it depends on your purposes. Generally speaking, you are allowed to convert songs from YouTube Music and burn them to CDs only for personal use. Thus, it is legal to burn YouTube Music to CD if you are simply going to enjoy the music yourself.
Where can I download free music to burn onto a CD?
YouTube offers a free Audio Library where you can download copyright-free music for burning to CDs. If you can't find the right track in the free YouTube Audio Library, you can also explore other royalty-free music websites or public domain music platforms, such as Jamendo Music, Free Music Archive, Musopen, and more.
Conclusion
To sum up, you'll need to download music from YouTube and then you can burn songs to a CD on your computer. Since the downloads from YouTube Music will be DRM-protected and restricted from burning, you can utilize TuneFab YouTube Music Converter to convert unlimited songs/albums/playlists to MP3 first, and then burn YouTube Music to a CD with Windows Media Player on Windows PC or the Music app on Mac.
