


Want to record music from YouTube for offline listening, editing, or personal use? While direct YouTube Music ripping is more convenient for saving music as local files, real-time recording is useful for capturing live streams, short music clips, or audio that cannot be extracted directly. It lets you record music as it plays, though the process takes as long as the recording itself and unwanted system sounds or notifications may affect the result.
This guide covers Windows loopback recording with Audacity, audio routing on macOS, and built-in screen recording on iPhone and Android. You will also learn how to reduce unwanted noise, avoid clipping, and trim and export your recordings. If you need ordinary local audio files more quickly, see the alternative at the end.
Note:YouTube's Terms of Service restrict copying, downloading, and other uses of its content unless expressly authorized by YouTube or permitted by applicable law. Recording audio in real time does not automatically grant permission to reuse or distribute it. Check the applicable terms, copyright rules, and any permissions required for your intended use.
How to Record Audio from YouTube on Windows with Audacity
Audacity is a free audio editor that can capture computer playback on Windows through Windows WASAPI loopback. Unlike microphone recording, loopback captures the audio sent to your selected playback device, so you can record YouTube music without picking up nearby conversations. System sounds routed through the same device may also be captured.
After recording, Audacity lets you trim unwanted sections, cut or delete mistakes, and reduce background noise. You can also export recordings in formats such as MP3 and WAV for offline listening or further editing.
Step 1: Download Audacity from its official website and launch it.
Step 2: In Audacity, go to Audio Setup > Audio Settings and configure the following options:
- Audio Host: Windows WASAPI
- Recording Device: Select the loopback input matching your playback device, such as Speakers (loopback).
- Playback Device: Select the device you use to listen to YouTube.
- Recording Channels: Choose 2 (Stereo).
WASAPI loopback captures digital audio from your selected playback device, even if your computer doesn't have a Stereo Mix input.
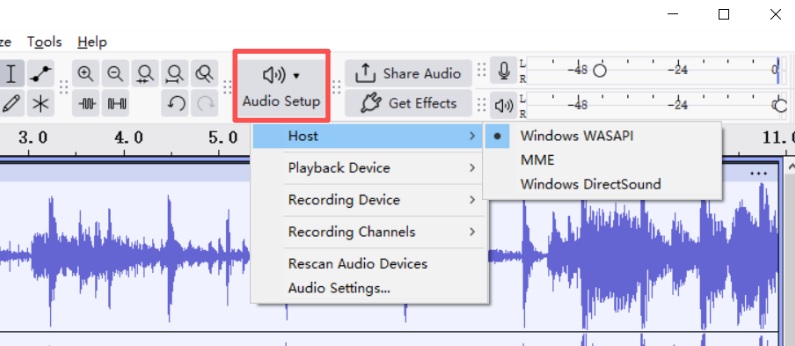
Step 3: Open YouTube and find the audio you want to capture. In Audacity, make sure Transport > Transport Options > Enable audible input monitoring is turned off to prevent echoes or distorted sound.
Turn off system notifications and close unnecessary apps to avoid recording alerts or other system sounds. WASAPI loopback captures computer playback, not microphone input, so you don't need to disable your microphone.
Note: Before recording the full track, play the loudest section and watch Audacity's recording meter. Aim for a maximum peak around −6 dB, leaving headroom below 0 dBFS to reduce the risk of clipping. If the meter reaches 0 dB or the waveform shows clipping, lower the recording level and test again.
Step 4: Start playing the YouTube audio before clicking Record in Audacity. Let it play through the section you want to capture, then click Stop. Recording takes roughly as long as the audio itself, so a 30-minute playlist requires about 30 minutes of real-time recording, plus setup and editing.
Step 5: Select unwanted sections and press Ctrl + T to trim the recording, or use Cut and Delete to remove mistakes. If needed, apply Audacity's Noise Reduction effect to reduce consistent background noise.
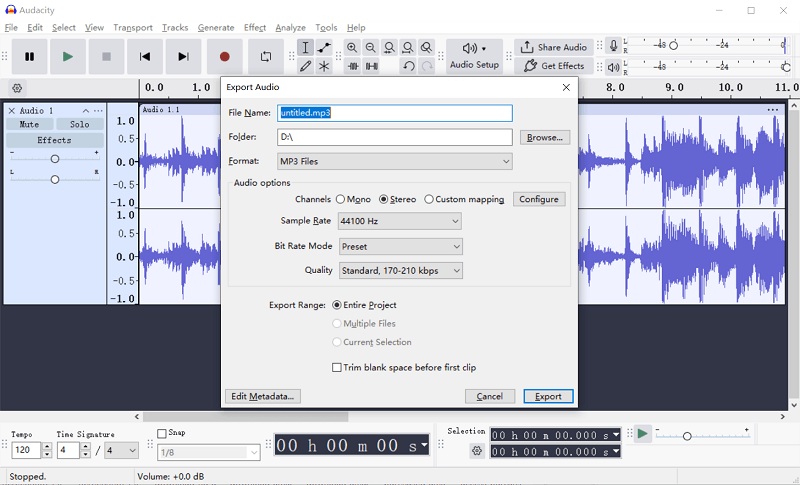
Go to File > Export Audio and choose MP3 for smaller files or WAV for uncompressed output and further editing. After exporting, play the file to check the beginning, ending, volume, and sound quality.
How to Record Audio from YouTube on Mac with Audacity and BlackHole
Unlike Windows, macOS requires an additional audio-routing tool to capture system audio in Audacity. You can use BlackHole to route your Mac's audio output to Audacity, allowing you to record YouTube music as it plays while monitoring playback through your speakers or headphones.
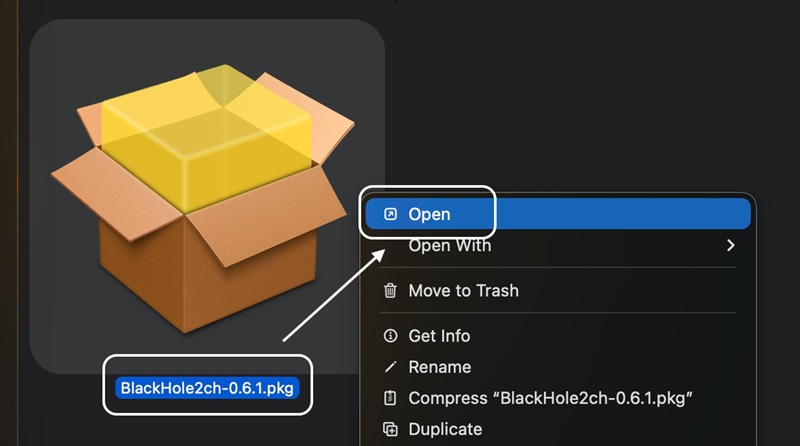
Step 1: Download Audacity and install BlackHole 2ch, following the installation instructions.
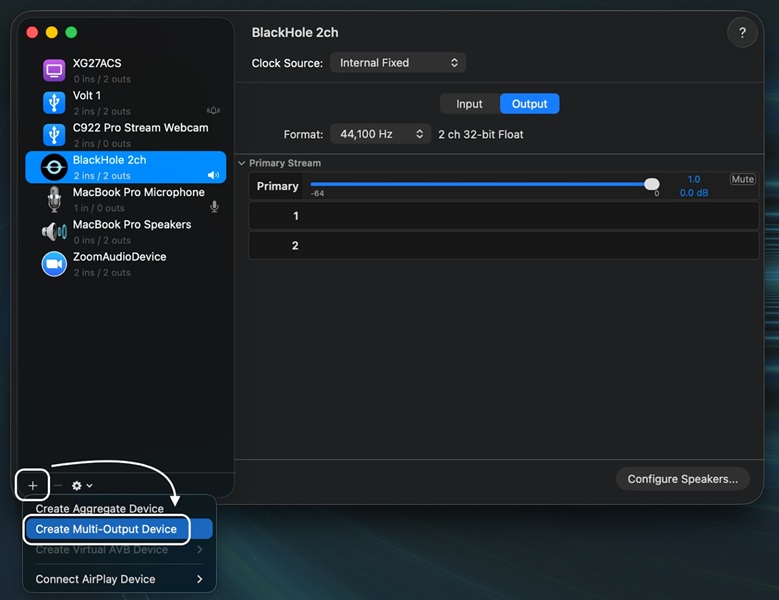
Step 2: Open Applications > Utilities > Audio MIDI Setup, click + > Create Multi-Output Device, and select both your speakers or headphones and BlackHole 2ch. Enable Drift Correction for BlackHole, then set the new device as the Mac's sound output under System Settings > Sound > Output.
Step 3: In Audacity, open Audio Setup and select Core Audio as the host and BlackHole 2ch as the recording device. Play a short YouTube clip and confirm that the recording meter responds.
Before recording, check the level during the loudest section. Keep peaks below 0 dBFS; aiming for around −6 dB provides practical headroom. Turn off notifications, close apps that may play alert sounds, and make sure Audacity's audible input monitoring or software playthrough is turned off.
Step 4: Click Record, play the desired YouTube segment, then click Stop when finished. Allow approximately the same amount of time as the segment's playback length, plus time for setup and editing.
Step 5: Remove unwanted sections and select File > Export Audio to save the recording as MP3 or WAV. Play the exported file to verify that the audio was captured correctly.
How to Record Music from YouTube Music on iPhone
After checking the methods to record YouTube Music on computers, now also see the ways to do it on mobile phones. Firstly, as the iPhone has added a built-in recording feature in the iOS system, you can directly use it to record music from YouTube on iPhone. If you haven't used this function before, just follow the steps below and add it to your Control Center to record YouTube Music easily.
Note: iPhone saves screen recordings as video files, not standalone audio files. If you only need the audio, extract the audio track from the saved video using a suitable tool.
Step 1. Firstly, you need to open "Settings" and then go to "Control Center" to add "Screen Recording" to the "INCLUDED" list.
Step 2. Before recording, turn off the microphone and enable Do Not Disturb or a Focus mode to avoid capturing ambient noise and interruptions from notifications. Tap the Screen Recording button and wait for the three-second countdown. Keep the microphone off to avoid capturing ambient sound, then return to YouTube and play the audio you want to record.

Step 3. Once the music stops playing, click the same button in the control center, and the recorded YouTube Music can be saved in your camera roll immediately.
Note: Open Photos and play the saved recording to confirm that the audio was captured. Some apps may restrict audio or video recording.
How to Record Music from YouTube on Android
Many Android phones and tablets have built-in screen recording features, eliminating the need for third-party apps. Depending on the device and Android version, you may be able to capture device audio without recording microphone input. Screen recording saves a video rather than an audio-only file.
Step 1: Swipe down from the top of your screen twice to expand Quick Settings, then tap Screen record. If you can't find it, edit Quick Settings and add the Screen Record tile.
Step 2: Choose to record audio and select the appropriate audio source if your device offers this option. Keep the microphone off to avoid capturing background noise, and enable Do Not Disturb to minimize notification interruptions.

Step 3: Tap Start and wait for the countdown. Open YouTube and play the audio you want to capture. When finished, swipe down and tap the screen recorder notification to stop recording.
Step 4: Open Google Photos and look under Collections > On this device > Movies to find the recording on supported Pixel devices. Play the video to confirm that the audio was captured successfully.
Note: Some apps or devices may restrict internal audio capture. If you need only the audio, extract the soundtrack from the saved video and export it as MP3 or WAV. As with iPhone, recording takes about as long as the audio plays, excluding setup and any later editing or conversion.
Fast Alternative to Record YouTube Music on Desktops
As we know, although there are many screen recorders working to record YouTube Music on desktops, not all of them will carry the same output quality. Also, most of them can't speed up the recording process and it would be a waste of time if you had many songs to record from YouTube Music.
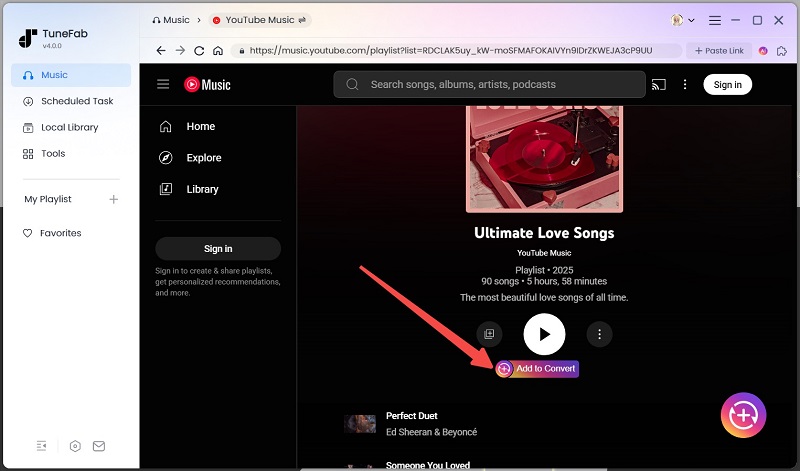
So if you are just finding a better way to record YouTube Music quickly and in high quality, TuneFab YouTube Music Converter is highly recommended to you. Even though this software is not exactly a recorder, it works even better to help you save music from YouTube offline. TuneFab YouTube Music Converter will use the official YouTube Music Web Player to enable you to access all YouTube Music songs released by the officials. Instead of opening another software to process the recording, you can directly download YouTube music to MP3 or other formats - then you can edit or cut them based on your needs!
Key Features:
- Embeds YouTube Music web player for music download and exports music to MP3/FLAC/WAV/M4A/AIFF
- Supports batch downloading YouTube Music songs instead of recording them one-by-one
- Provides up to 35X faster to download music from YouTube Music and saves your time
- Provides adjustable settings to save YouTube Music in the quality you like
- Saves ID3 information with the songs for easier music management offline
FAQs
How to Fix Audacity Not Showing a Loopback Input
If you can't find a suitable loopback input, check that Windows WASAPI is selected as the audio host and that your playback device is available. You can also update the correct audio drivers for your Windows version.
As an alternative, check whether Stereo Mix or a similarly named input is available:
1. Right-click the speaker icon in the Windows taskbar and open Sound settings or Sounds, depending on your Windows version.
2. If the classic Sounds window is available, open the Recording tab.
3. Right-click the device list and enable Show Disabled Devices. If Stereo Mix appears, right-click it and choose Enable.
4. Return to Audacity and select that input. Make sure YouTube audio is playing through the sound device associated with Stereo Mix.
Stereo Mix may not be available on every computer and generally requires playback through its associated audio device. For USB or wireless headphones and other external playback devices, WASAPI loopback is usually the more suitable option.
Note: Recording or distributing YouTube content may be subject to copyright law, platform terms, or other restrictions. Check the applicable requirements before recording or sharing material.
How to Convert a YouTube Music Screen Recording to Audio on Phone?
If you record YouTube Music using your iPhone or Android's built-in screen recorder, the result is usually a video file. You can use a free online video-to-audio converter, such as FreeConvert, to extract the audio and save it as an MP3 file.
1. Open FreeConvert's Video to MP3 Converter and click Choose Video Files to upload your screen recording.
2. If needed, adjust the audio settings, volume, or trim the recording to keep only the section you want.
3. Click Convert and wait for the process to finish.
4. Once the status shows Done, click Download MP3 to save the audio file.
FreeConvert supports various video formats, including MP4, MOV, MKV, and WebM. The free service has a file-size limit, and uploading recordings requires sharing the files with a third-party service. Check its terms and privacy policy before uploading, especially if your recording contains private content.
In Conclusion
Recording music from YouTube is useful when you need to capture live streams, short audio clips, or content that cannot be extracted directly. On Windows and Mac, Audacity lets you record system audio in real time, while built-in screen recording on iPhone and Android can capture audio as part of a video. You can then convert the recording to MP3 if you only need the audio.
Keep in mind that recording takes as long as the audio plays, and the final quality depends on the source and recording settings. If you want to save YouTube Music tracks or playlists as local audio files without recording them in real time, TuneFab YouTube Music Converter offers a more direct alternative with batch conversion and multiple output formats.

