

If you are trying to add Apple Music to GarageBand, the first thing to know is this: Apple Music songs usually cannot be imported into GarageBand directly. Even if a track is downloaded in the Apple Music app, it is not always available as a normal local audio file that GarageBand can use. So the real issue is not just how to add a song. It is whether GarageBand can actually use the file you have.
In this guide, we will explain why Apple Music songs may be greyed out or missing in GarageBand, then show you how to make the file usable and import it on Mac, iPhone, or iPad.
Tool used in this guide: Streaming music converter for creators.
Can You Add Apple Music to GarageBand Directly?
In most cases, no. You cannot add Apple Music songs to GarageBand directly if they are only available through your Apple Music subscription.
GarageBand can import normal local audio files. So if a song is already saved on your device as an unprotected file, importing it is usually simple. But if the track is only available as an offline download in Apple Music, it may not appear in GarageBand at all, or it may appear greyed out. That leads to problems like these:
- The song does not appear in GarageBand
- The title is visible but greyed out
- The file cannot be dragged into a project
- The track is available in the Music app, but not in Files or Finder
Before you try anything else, check what kind of file you actually have. If the song only exists inside Apple Music, you will need to save it in a format GarageBand can use.
Choose the Right Way Based on Your Situation
Before you start, pick the right method based on your situation.
| Your situation | Best next step |
| You already have a local, unprotected audio file | Go straight to the import steps below. to Mac → | to iPhone or iPad → |
| The song is only available in Apple Music | Prepare a GarageBand-compatible file first |
| You want better audio quality for editing | Use a higher-quality format for cleaner editing results. |
Part 1: Make Apple Music Usable in GarageBand
If your song is only available through Apple Music, the easiest fix is to save it as a local file that GarageBand can use.
TuneFab Apple Music Converter can help with that. Instead of leaving the track inside the Apple Music app, it lets you export Apple Music songs as files GarageBand can use, such as MP3, M4A, WAV, AIFF, and ALAC.
TuneFab Apple Music Converter is especially useful for GarageBand because it helps you:
- Export Apple Music in formats GarageBand can use, including MP3, M4A, WAV, AIFF, and ALAC
- Keep solid audio quality for covers, demos, practice tracks, and other editing work
- Convert songs, albums, or playlists in batches, which is handy if you need several tracks for one project
- Keep ID3 tags like artist and album name, so your files are easier to sort later
Best Output Formats for GarageBand
Before you convert, choose the right format that makes the next step easier. If you are not sure where to start, pick MP3.
| Format | Best for... |
| MP3 | easiest for most users and everyday GarageBand projects |
| M4A | compact and convenient for regular use |
| WAV / AIFF | better for higher-quality editing, covers, and demos |
| ALAC | keeps more audio detail, but creates larger files |
Convert Apple Music to a GarageBand-Compatible Format
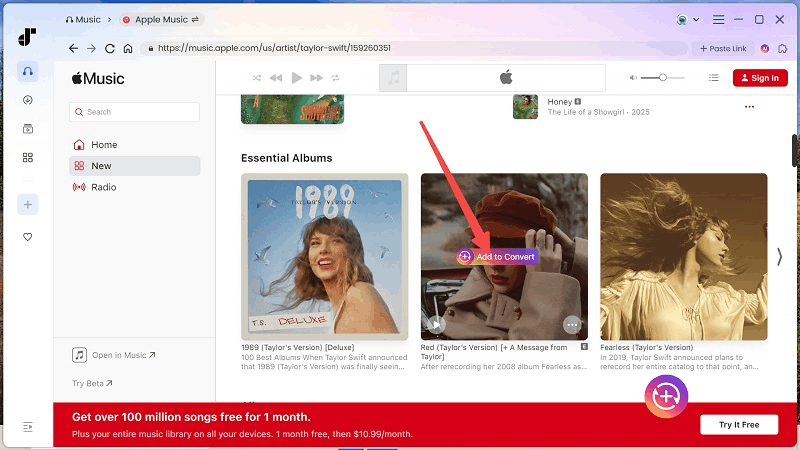
Step 1. Open TuneFab and access your Apple Music library
Launch TuneFab Apple Music Converter, then sign in to Apple Music to view your songs, playlists, and albums.
Step 2. Choose the songs you want to use in GarageBand
Find the track, album, or playlist you want, then add it to the conversion list.
Step 3. Pick an output format
Choose a format GarageBand can use, such as MP3, M4A, WAV, AIFF, or ALAC.

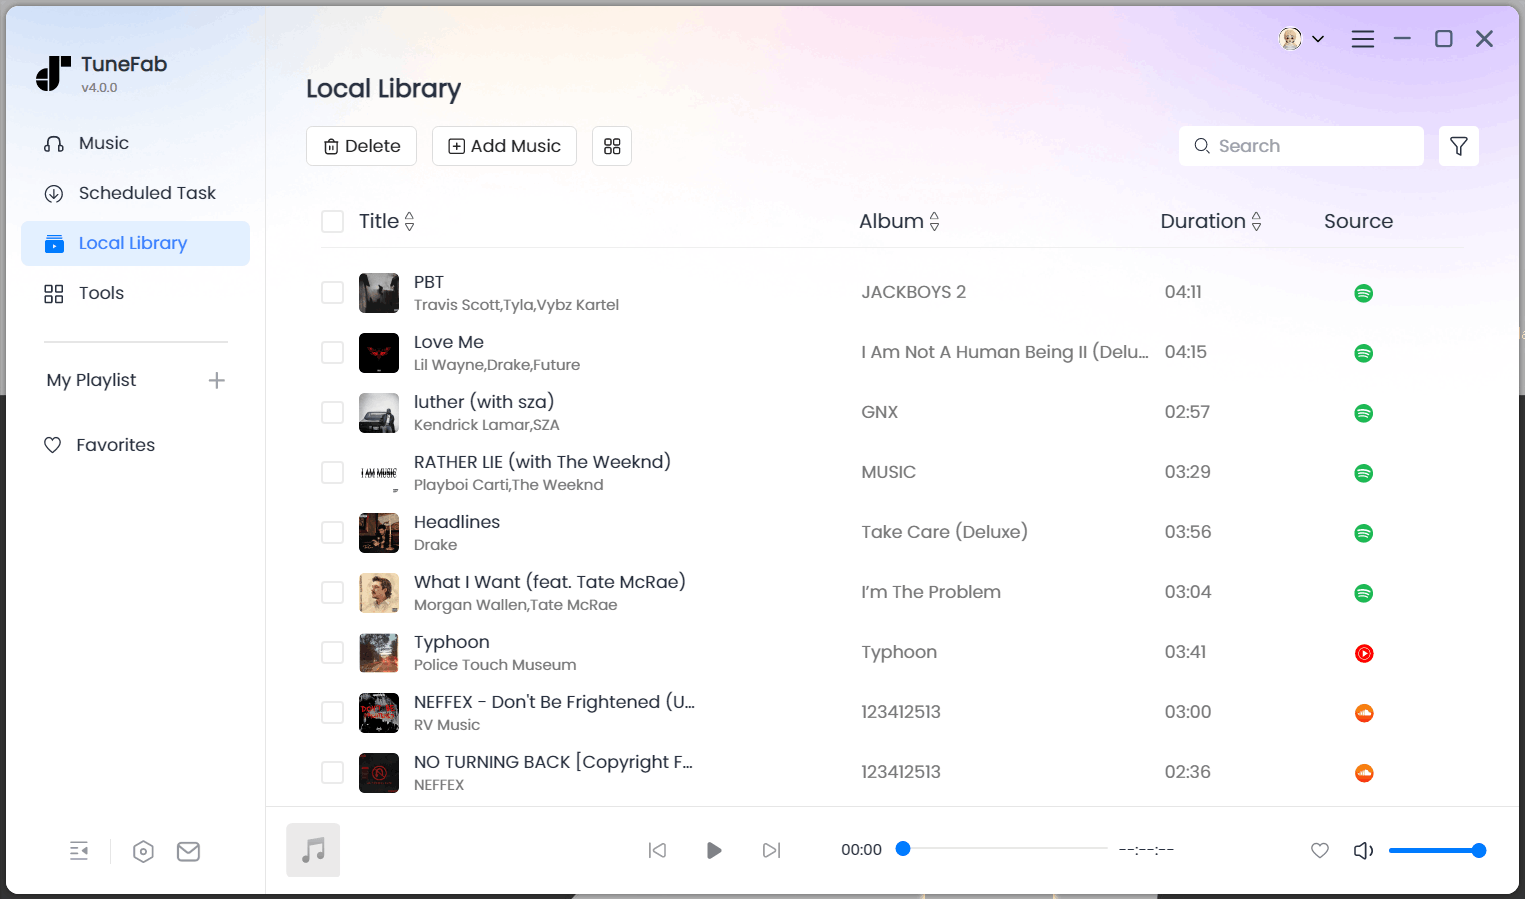
Step 4. Convert and locate the output file
Start the conversion, then open the output folder when it is done. You now have a local file ready for GarageBand.
Part 2: Add Apple Music to GarageBand on Mac, iPhone, and iPad
Once the song is saved as a normal local file, the rest is much easier. From here, you can import it into GarageBand on Mac, iPhone, or iPad.
Add Songs from Apple Music to GarageBand on Mac
Adding the converted music file to GarageBand on Mac is usually the easiest part.
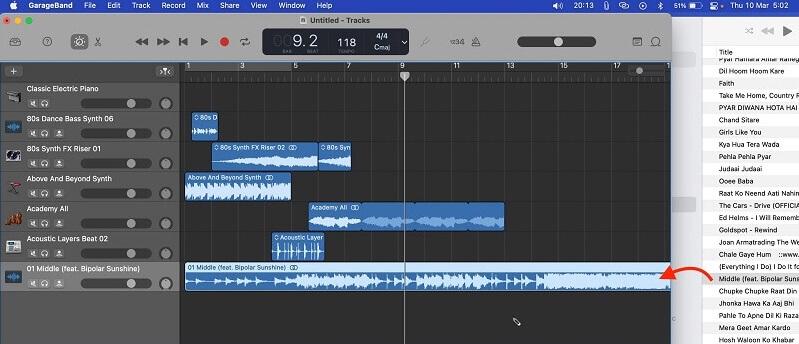
Step 1. Open GarageBand on your Mac and start a new project or open an existing one.
Step 2. Go to the folder where your converted Apple Music file is saved.
Step 3. Drop the file into your project timeline or track area. GarageBand should import it right away.
Step 4. Once the track is in the project, you can trim it, loop it, mix it, or use it as a backing track.
Tip: If drag and drop does not work, make sure the song is saved as a normal local audio file and not just available inside the Apple Music app.
Import Songs into GarageBand from Apple Music on iPhone or iPad
To add Apple Music to GarageBand on iPhone or iPad, you need to move the converted file to your device first. Here are two simple ways to do that:
Method 1: Import Music from the Files App
This is the easiest method if your converted song is already saved in iCloud Drive, Dropbox, or another location you can access in the Files app.
Step 1. Make sure the audio file is available in iCloud Drive, On My iPhone, On My iPad, or another supported location.
Step 2. Start a new project or open an existing one.
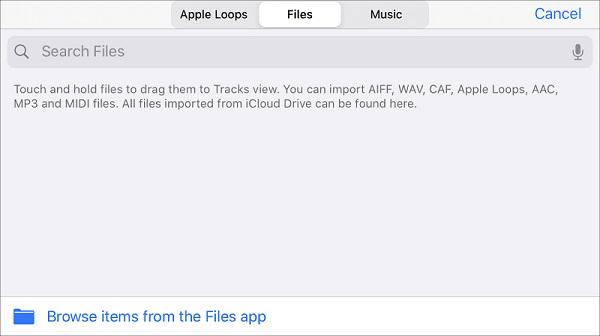
Step 3. In the top-right area, tap the loop icon and switch to the Files tab.
Step 4. Find the file, then drag it into the track view.
Method 2: Transfer the File from Mac or PC
If you prepared the song on a computer, you can move it to your iPhone or iPad first, then import it into GarageBand. This is especially useful if you want to prepare several songs on your computer and use them on your phone or tablet later.
Step 1. Connect your iPhone or iPad to your computer, then sync or transfer the converted audio file to the device using Finder, iTunes, or another supported transfer method.
Step 2. After the file is transferred, save it somewhere your device can access, then open GarageBand, tap the loop icon, and import it from the Files tab.
Step 3. Find the file and drag it into the track area.
FAQs About Adding Apple Music to GarageBand
Can You Use Apple Music in GarageBand?
Yes, but usually not through the Apple Music version of the song. In most cases, you need a local file that GarageBand can import. If you do not have the local file, the first thing you should do is download Apple Music songs.
Why Are Apple Music Songs Greyed Out in GarageBand?
They are often greyed out because GarageBand cannot use the song as a normal local audio file. If the track only exists through Apple Music access, GarageBand may not be able to import it the way you expect.
What Is the Best Audio Format for GarageBand?
For most users, MP3 is the easiest format to start with. If you want better quality for editing or mixing, WAV or AIFF is usually the better choice.
Can You Make a Ringtone in GarageBand with Apple Music?
Yes, but you still need a file GarageBand can use first. Once it is imported, you can trim the part you want and export it as a ringtone.
Further reading: Once the song is in GarageBand, you can also use it for a ringtone or alarm.
Conclusion
If your song is already a normal local audio file, adding it to GarageBand is usually simple. But if the track only exists inside Apple Music, you need to save it in a format that GarageBand can use first.
Once you have the file, importing it on Mac, iPhone, or iPad is much easier. If your song is still stuck inside Apple Music, the easiest way forward is to save it as a GarageBand-ready file first.
