


When you get bored at home, splicing up and editing your digital video collections can be an interesting activity that turns boring into brilliant. However, for those who have bought a bunch of movies from iTunes Store and want to import and edit these iTunes M4V videos on video editing software such as Adobe Premiere or Sony Vegas, they are very likely to get disappointed that Adobe Premiere just shows a grey screen when importing iTunes videos to it. Luckily, your problem will get a quick fix with an iTunes movie converter.
In this article, you will get to know how to edit M4V files in Adobe Premiere Pro. With the help of a powerful iTunes M4V video converter, it is much easier to import iTunes M4V videos to Adobe Premiere Pro, making it achievable to edit M4V in Adobe Premiere.
Part 1. Why You Fail to Import M4V Video to Adobe Premiere Pro
Adobe Premiere Pro, a professional video editor, has gained extensive popularity in the world. Normally, Adobe Premiere Pro supported formats include M4V, 3GP, ASF, AVI, BWF, DV, H264, HEVC, DV, M2TS, M2V, MOV, MP4, MPG, MPEG, MTS, MXF, WMV and etc. When a video is unable to import and play on Adobe Premiere Pro, two factors should be taken into account, Namely, you've imported an incompatible video format or the video file is incomplete or corrupted. As you may notice, the iTunes M4V video should be compatible with Adobe Premiere. However, the problem occurs even if we import a complete iTunes M4V video.
The issue is related to the airplay DRM copyright protection that is encrypted into the iTunes M4V video. This is a technology to protect the copyright of digital video content and prevent any illegal piracy. It is understandable, though, it also brings inconvenience that somehow restricts users' legitimate rights, for example, failure in importing videos that you've legally purchased to Adobe Premiere Pro.
That being the case, iTunes DRM protection is indeed hard to get around. Still, it is feasible to import iTunes M4V videos and edit M4V in Adobe Premiere Pro. You just need to take the DRM out of iTunes M4V videos. And TuneFab M4V Converter is the exact tool that helps you remove DRM from iTunes movies, TV shows, and music videos and makes it easy and possible to import and edit iTunes M4V videos to Adobe Premiere.
Part 2. Ultimate Solution: Remove iTunes Movie DRM with TuneFab M4V Converter
TuneFab M4V Converter, a professional video converter, works perfectly on removing DRM from iTunes M4V videos. It is able to convert M4V to MP4 in high output quality and fast conversion speed and deliver a playable and editable video that is supported on Adobe Premiere Pro. If you are looking for a tool that helps you get a DRM-free iTunes video, TuneFab M4V Converter is an ideal option.
Tip: Similar to the MP4 format, the M4V file format is developed by Apple to label video files on its iTunes Store. The major difference between MP4 and M4V format is that M4V files may optionally be protected by DRM copy protection.
Part 3. 4 Simple Steps to Import and Edit iTunes Movies in Adobe Premiere
Follow the steps to learn how to import iTunes movies to Premiere Pro.
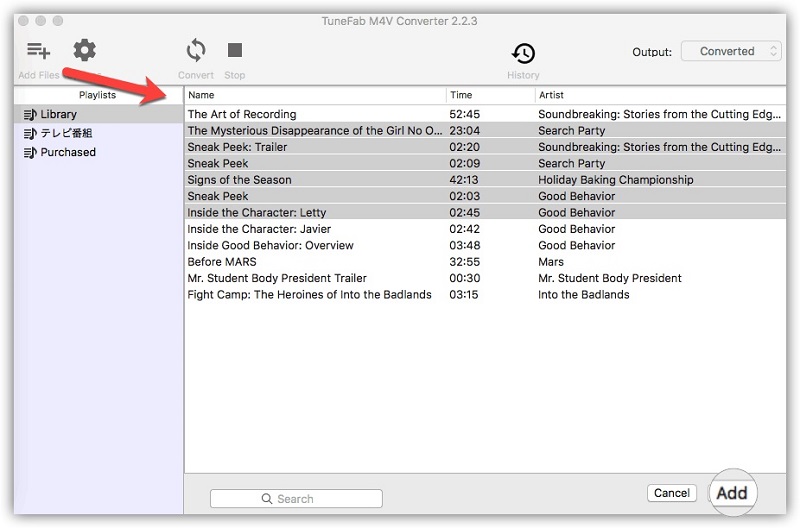
Step 1. Add DRM-protected iTunes M4V Videos
Download the iTunes videos you want to convert. Then go to iTunes Library and directly drag them to TuneFab M4V Converter. Or you can click the "Add Files" button on the menu bar to locate and import the downloaded iTunes M4V file to the converter.
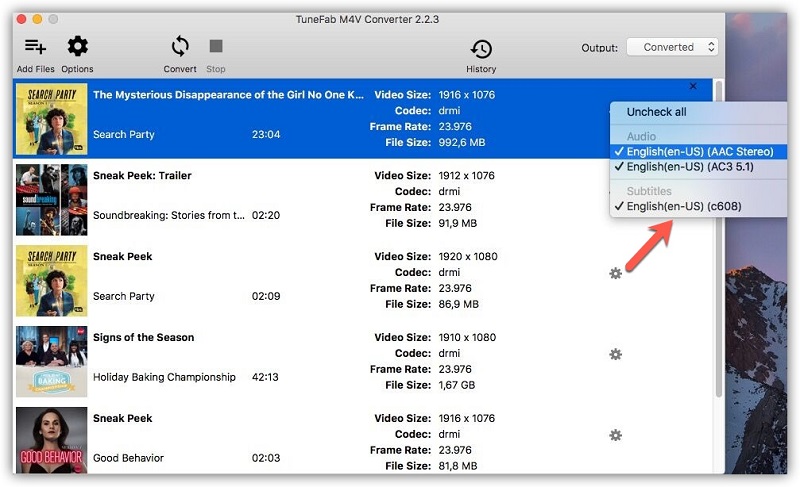
Step 2. Change Output Settings
You should prepare the properly encoded videos that meet the parameter for Adobe Premiere Pro. So just adjust the output settings for your iTunes M4V videos. Normally, you can choose a specific file and click the "Gear" icon beside it to keep your preferred audio tracks and subtitles in the output file. Or you can just skip the step and preserve all original audio tracks and subtitles. TuneFab M4V Converter has set MP4 as the output format by default.
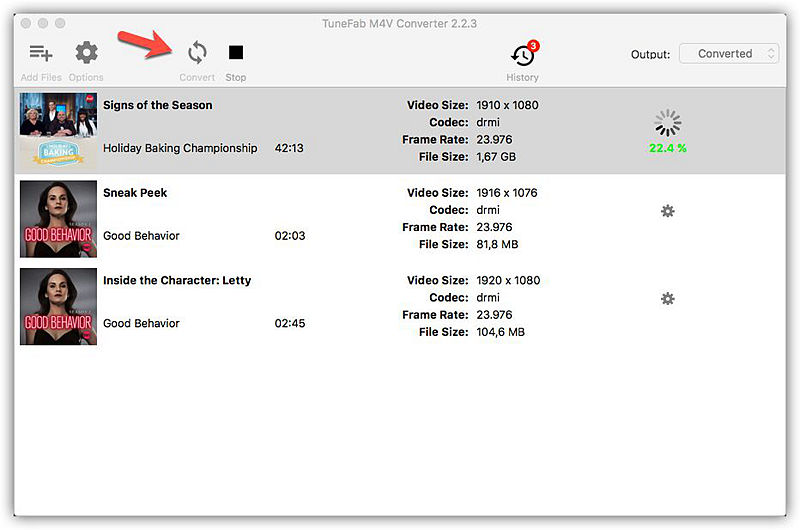
Step 3: Convert M4V to MP4
Click the "Convert" button from the menu bar. Then TuneFab M4V Converter will remove the DRM from iTunes M4V videos during conversion. The whole process will be completed in a few minutes and it won't cost you too much time. When the conversion process is over, go to your destination folder and find the converted M4V files.
Step 4. Import Converted M4V Video to Adobe Premiere Pro
Now launch Adobe Premiere. Click the "New Project" menu and personalize settings. Click "OK" and you will be able to create a sequence that contains at least one video track and one audio track. Finally, click "File" from the menu bar and choose the "Import" to import the converted iTunes video files to Adobe Premiere. And now you will find you can edit the DRM-free iTunes video.
Final Words
Just four simple steps and you can easily break the inconvenient iTunes DRM protection and gain an editable iTunes video. With TuneFab M4V Converter, It should not be that difficult to import protected iTunes movies to Adobe Premiere Pro. And you are free to edit the converted iTunes M4V videos in Adobe Premiere Pro.
Related Article: